Follow:
Browsing Tag:

Sally Hansen

    Stamping, Studs, Uncategorised

    Snippet: Blue Grey

    My base colours are Sally Hansen Gray by Gray, Sally Hansen Thinking of Blue and Sally Hansen Ion. Gray by Gray and Ion are currently available for £1.50 from Fragrance Direct which is quickly becoming my favourite place to shop for polish online! 
    All three of the stamped designs are from Bundle Monster Plate BM315 and I used Barry M Gold Foil
    I attached the studs by painting on a top coat and applying them while it was still wet. The studs on my pointer can be found here and the square studs here, both from Born Pretty Store. 
    It’s all finished off with a coat of No7 Stay Perfect Top Coat except for on the nails with studs as top coat tends to make the colour run.

    TwitterBloglovin’Tumblr

    Share:
    Freehand, Uncategorised, Waterfall

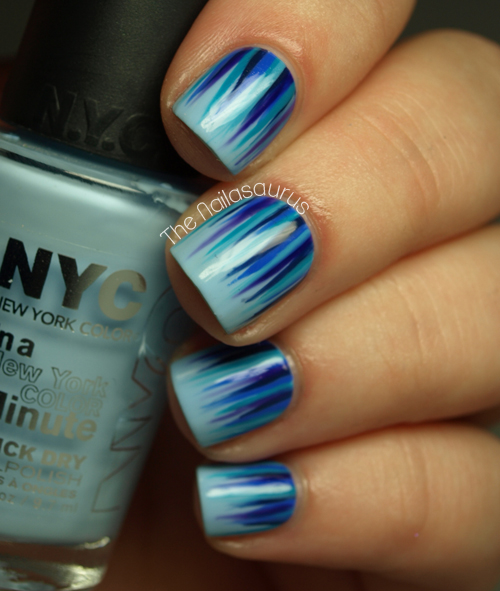
    Blue Waterfall Nail Art

    This nail art builds on one of my manis from last week – Getting Skirty. That mani was so simple, I absolutely loved wearing it and was left wanting more. I thought I’d try it again this week but build on it a little and this was the result!
    Honestly, I am head over heels, pure in love with this style! I can’t wait to try out some more colour combinations. I think the complimentary colours look nice but it would look really edgy with clashing colours. If there are any colour combos you’d like to see let me know because you’re definitely going to be seeing a few more of these manis from me.

    I used NYC Raindrop as my base colour and then took a striping brush to paint on all the different colours from the cuticles upwards towards the tip.
    The colours included in the ‘waterfall’ are Barry M Blue Grape, Sally Hansen Himalayan Blue, Sally Hansen Pacific Blue, Nails Inc Belgrave Place and NYC Water Street Blue.
    It’s all finished off with two coats of No7 Stay Perfect Top Coat.

    TwitterBloglovin’Tumblr

    Share:
    Freehand, Glitter, Uncategorised

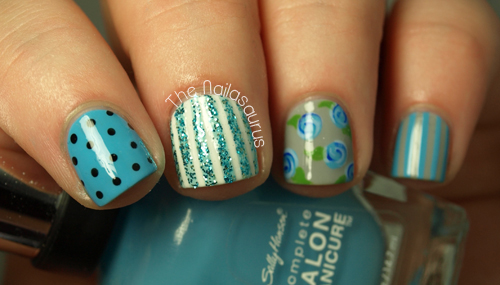
    Spots and Stripes

    I’m back on the Blues this week and it feels gooood! Polka dots are a rarity on my nails and since I do so many stripes I thought I’d give spots a go too.

     
    The main colours here are Sally Hansen Himalayan BlueBarry M WhiteSally Hansen Dorian Grey and W7 Black.
    I created the roses following this tutorial with SH Himalayan Blue, Essie Mezmerised and NYC Raindrop. The stripes on my middle finger are in W7 Cosmic Blue and there’s a tutorial for striping here!
    I topped it all off with two coats of No7 Stay Perfect Top Coat.

    TwitterBloglovin’Tumblr

    Share:
    Tutorial, Uncategorised

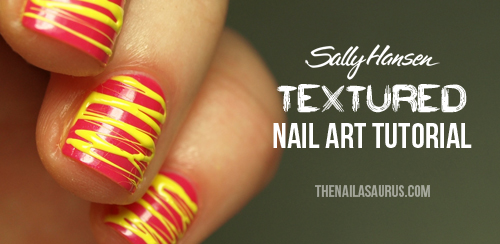
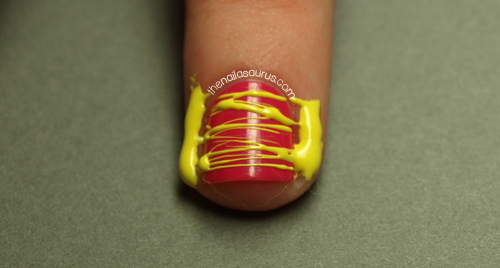
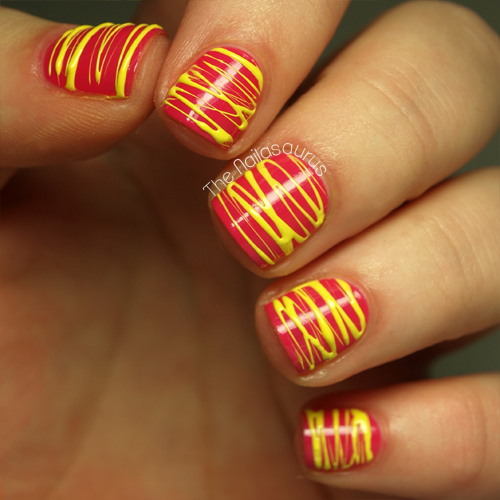
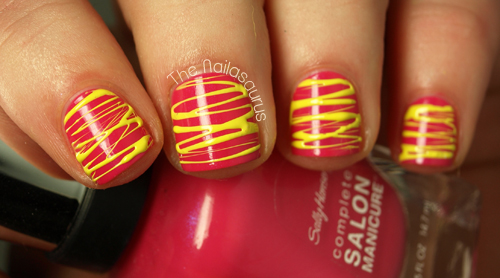
    Sally Hansen Textured Nail Art Tutorial: Sugar Spun Nail Art

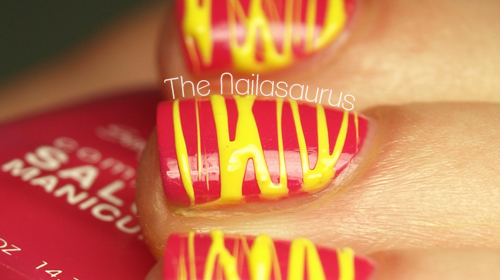
    June is the last month for you guys to enter Sally Hansen’s I ♥ Nail Art competition over on their Facebook page so I’m here with some inspiration for this month’s theme… Textured Nail Art! I’ve gone for the sugar spun look because whenever I wear this design, I find myself constantly running my fingers over the textured surface. The process is a bit messy but I think it’s worth it for the finished look!

    For this design I’m using Sally Hansen Xtreme Wear Mellow Yellow and Sally Hansen Complete Salon Manicure Back to the Fuschia. You’ll also need some toothpicks and a top coat. My favourite is Sally Hansen Dries Instantly

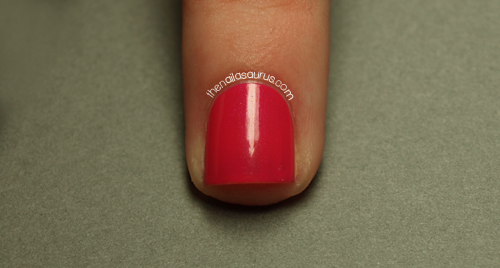
    Start by painting your nails with Back to the Fuschia and applying a top coat of Dries Instantly. Wait for them all to dry and then move on to the next step.
    Lay out a sheet of plastic, baking paper or something similar and make a little puddle of Mellow Yellow. Leave it for a few minutes then start to stir it with a toothpick. You’ll notice it getting thick and stickier but try to keep the consistency regular by working it with the toothpick. When the polish is making strings like you see in the picture, you’re ready to move on.
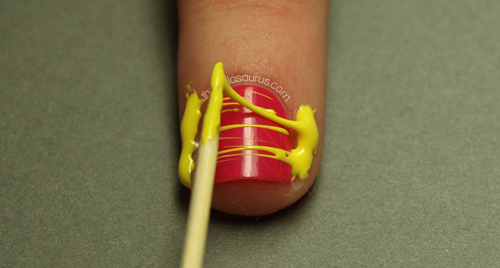
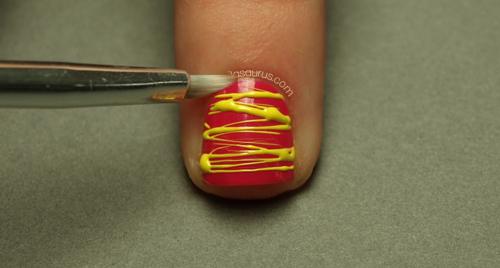
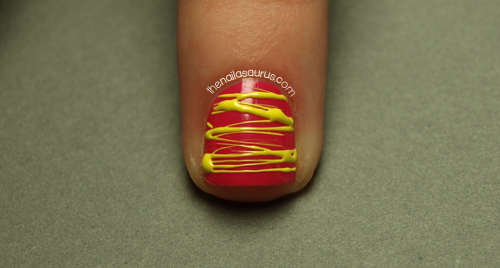
    This is where things get messy and a little more tricky! Get a little blob of Mellow Yellow on the end of your toothpick and dab it on the skin at one side of your nail, then quickly move it over to the other side stretching the polish as you go. 
    You could use a product like Liquid Palisade around your nails before you start to make cleaning up the mess a little easier.

    Once you’re happy with your sugar, wait for it to dry completely.

    Using a small nail art brush dipped in acetone, clean up around the edges of your nails. I choose not to apply a top coat on top of the design to keep as much texture as possible.

    All done! Don’t forget to enter your own Textured Nail Art looks in to Sally Hansen’s I ♥ Nail Art competition on Facebook for the chance to win $500 and a trip to NYC!

    Share:
    Uncategorised

    Banish the Blues: A Very Good Place To Start

    You may have noticed that I love blue! It’s the most popular tag on my blog with a staggering 187 posts which means about 1 in 5 of my posts contain blue nail polish. There’s a whole rainbow out there and I want to take some time to know the rest of it so this week I’m banishing blue from my blog. I’m not allowed to use any blue nail polish for at least 7 days… welcome to ‘Banish the Blues’!
    There are so many polishes in my collection that don’t get used very often at all so I’ve been making more of an effort to look through the whole thing and match up interesting combinations. I think challenging myself to a blue free week is the perfect way to do so. Maybe I’ll even find a new love (but I doubt it!).
    Today I’m starting from the very beginning of the rainbow with red and orange. I don’t think I’ll be going in order for the rest of the week but I figured this would be a good place to start!

    I used Sally Hansen Dorian Grey as my base colour and then took a nail art brush to apply some random triangles with Barry M Passion Fruit (coral) and outline them with a thick border of Barry M Mango (orange). Then I used black acrylic paint to separate the two colours. It’s all finished off with two coats of No7 Stay Perfect Top Coat.

    TwitterBloglovin’Tumblr

    Share:
    Glitter, Uncategorised

    Pinky Minty

    Here’s the mint and pink concoction I mentioned in my last post. Luckily my nail art mojo has picked up a little since then thanks to a big ol’ Pinterest session! 

    My base colours are Sally Hansen Green Tea and Barry M Dragon Fruit. The purple for the zig-zags is China Glaze Tart-y for the Party and I created the pattern using craft scissors and scotch tape, there’s a quick step-by-step here
    The glitter on my ring finger is Angelica Spring Break and I finished it all off with a top coat of Sally Hansen Dries Instantly.

    TwitterBloglovin’Tumblr

    Share: