Today’s guest post is coming to you courtesy of Meghan from
Will Paint Nails for Food
Meghan’s been at the nail blogging game for less than a year but she’s already making waves and once you see her nail art you’ll know why! If you follow the
nail art tag on Tumblr, you’ve probably seen her nails on there more than a few times. She’s currently in the middle of the
31 Day Challenge so make sure you go and follow her to keep up to date with her creations!
Where to find Will Paint Nails for Food
Blog – Facebook – Instagram – Tumblr – Bloglovin’
——————————————————————————————-
Hi everyone! What an honour it is to be writing for this blog. Thank you Sammy for having me here!
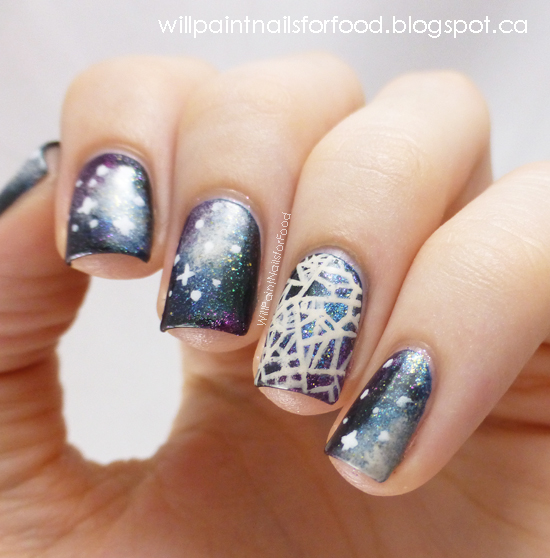
I had the idea of combining galaxy nails with some sort of fractal design months ago. I’m no expert on the subject but simply put, fractals are complex geometric designs where the small parts are very similar to the larger overall pattern. And there are many connections between galaxies and fractals – some believe the universe is just a large fractal.
I’m not sure how successfully the accent nail conveys the idea of fractals, however, you can check out the source image HERE .
Here’s the steps I took for these nails:
1. I started with a base of Essie Midnight Cami
2. Using little bits of makeup sponge I slowly built up the colours, first with the blues using piCture pOlish Cosmos, piCture pOlish Pshiiit, Foxy Paws One More Night, and Zoya Crystal
3. Then I built up the purples with Nicole by OPI Back In My Gloria Days, and Zoya Carly
4. I added my blacks with Orly Liquid Vinyl and Liquid Sky Lacquer Party All Night
5. I added the nebula effect with more Zoya Crystal and OPI My Vampire is Buff
6. I painted the stars with a detail brush and Sally Hansen White On
7. For the accent nail, the base is the same as the others, only I didn’t add the lighter nebula. The fractal design is painted with OPI My Vampire is Buff and a detail brush.
8. I finished with two coats of KBShimmer Clearly On Top
I love galaxy nails because, generally, most people use the same technique, but everyone’s looks different. I tend to use more polishes than necessary, you probably don’t need this many colours.
I hope you enjoyed my post, and thanks again Sammy for having me here!
Twitter ♥ Bloglovin’ ♥ Tumblr