Follow:
Browsing Tag:

Sally Hansen

    Freehand, Uncategorised

    Drip

    I found myself in a tricky spot earlier this week when I tried to get Google+ integrated with my blog. What a nightmare. I’ve never been a fan of Google+ or the way it was sort of forced upon us all and I was reminded exactly why when I tried to get a simple gadget for my sidebar! 
    Now that Google Reader’ facing iminent death (with GFC and Feedburner likely to follow), I suspect Google have some major changes up their sleeve to do with Google+ so I thought it was about time I just accept that and let it happen! I’m pleased to tell you The Nailasaurus now on Google+ right here and I really appreciate all your spare +1s or if you add me to one of your circles or something. There’s also a gadget in the sidebar where you can add me directly!
    If, like me, you’re not quite sold on the idea of Plus just yet, there are plenty of ways to follow this blog over there in the sidebar but I must say I recommend Bloglovin’ if you want to keep up with every post.
    Today’s nails really remind me of Art Attack. It’s completely unintentional but when I was admiring my handywork after the fact, that TV show came to mind. I loved watching that cheesy old show as a kid!

    My base colour is two coats of Sally Hansen Ion.
    I used a small art nail brush for the drips and the polishes I used, from pinky to thumb, are:
    NYC Wild With Passion, Sally Hansen Himalayan Blue, Sally Hansen Grass Slipper, Sally Hansen Rapid Red, NYC Lexington Yellow
    I used China Glaze Dandy Lyin’, a shimmery white, for the highlights.
    It’s all topped off with a few coats of Sally Hansen Dries Instantly.

    TwitterBloglovin’Tumblr

    Share:
    Glitter, Stamping, Uncategorised

    Just Give Me the Quick Gray by Gray

    After a tip off on Twitter last weekend, I found myself browsing Fragrance Direct and I found out where they’ve been hiding all those discontinued Sally Hansen shades! That website has stackloads of them for £1.49 including my favourite off-white – Ion, and flittery gold – Gilded Lily. After Googling for swatches of all the shades I didn’t already have, I settled on 3 colours including this beauty – Gray by Gray. It’s a very rich, blue tinted, dark grey.

    I started with a base colour of Sally Hansen Gray by Gray then stamped on the Paisley design from Bundle Monster Plate BM-315 using Essie Blue Rhapsody, a metallic blue.
    The glitter on my ring finger is Chit Chat Ariel which I picked up in Poundland. I finished it all off with a coat of Sally Hansen Dries Instantly plus an extra two coat over the glitter.


    TwitterBloglovin’Tumblr

    Share:
    Uncategorised

    Ahoy There Sailor!

    My go to summer style has been nautical for the past few years. I love the colour scheme, the stripes and the inevitable anchors that come with the package. Something sparked in me this week and I’ve gone nautical mad. Naturally a nail design followed!
    I used Barry M White as my base colour and then applied a coat of Sally Hansen Dries Instantly (my new favourite top coat!) before applying strips of striping tape across my nail to paint the lines. This tutorial will demonstrate. I used a nail art brush to paint the red and blue colours between the striping tape lines, then freehanded on the gold in between afterwards.
    The red is Sally Hansen InstaDri Rapid Red, the blue is Sally Hansen Thinking of Blue and the gold is Barry M Gold Foil. Finally, I finished it all off with two coats of Sally Hansen Dries Instantly.

    TwitterBloglovin’Tumblr

    Share:
    Freehand, Uncategorised

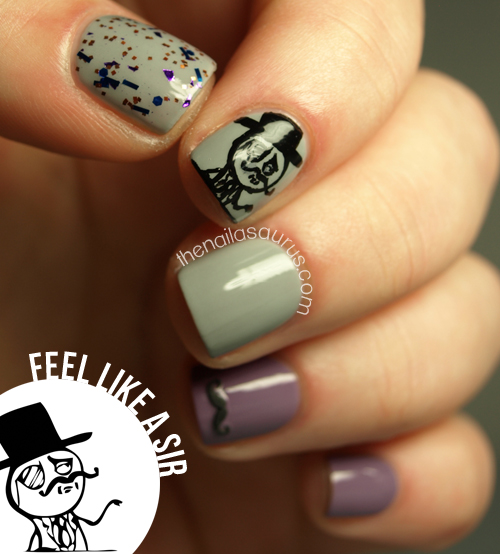
    Feeling Like A Sir

    This week I found a gem of a bargain when I was in Asda. Don’t judge me when I tell you I buy clothes and jewellery from there on a regular basis! I was browsing the girls jewellery, as you do, and I spotted a little packet of moustaches. There was no indication on the packaging as to what they were but using my detective skills I quickly deduced that they were in fact, as I had immediately suspected, nail decals! Hidden away amongst the pink clip in hair streaks and plastic tiaras!
    They were a complete steal at £1.50 for 48 stickers and they’re absolutely great. They’re kind of foamy and the adhesive layer is really thin so they’re easy to handle and stick to the nails really well. The first time I wore them, I used a top coat and they were unmovable. This time around I didn’t and the sticker slid off after about 12 hours of wear so go for a top coat if you’re going to try them yourself. 
    The smallest design, the curly one, immediately made me think of the ‘Feel Like A Sir‘ meme so of course I had to put it on my nails!

    I used Sally Hansen Dorian Grey and A-England Guinevere as my base colours with a coat of WellNails Rock In The New Year on my thumb. The Mo’ decal is, as previously stated, from Asda and I painted on the Sir using a nail art brush and acrylic paint.
    Everything is topped with a coat of No7 Stay Perfect Top Coat except for the sticker, I put that on after the top coat.

    TwitterBloglovin’Tumblr

    Share:
    Glitter, Stamping, Uncategorised

    The Nailasaurus is 3!

    3 years ago, on this very day, I sat down at my computer, signed up to Blogger and created this blog. I didn’t have big dreams for it at all, at the time it was just my little contribution to the very small online community of people who were passionate about polish and quite honestly a great way to procrastinate on my school work! 
    Today it’s a huge part of my life and I could never have imagined it would become what it is today. I feel like I owe a lot to this blog and I know my life would be very different today if I hadn’t spent the last three years diving head first into my nail art obsession! Of course, I owe all of this to you guys. Thank you so much for reading, commenting, sharing and just generally being an awesome bunch of readers!
    I thought I’d take a look back through the archives and dig out an early mani to recreate it and I’ve gone with the ‘Mint Mesh‘ from July 2010, about 3 months in to my blog. Back in the day I used to post exclusively stamping manicures on a daily basis. I didn’t start experimenting with other nail art techniques for months and it was almost a year before I tried my first freehand nail art. It’s good to see the immense improvement in the photography and my neater nails and cuticles.

    This time around I used Sally Hansen Green Tea as my base colour, then stamped on the fishnet design from Konad Plate M57 using Barry M Gold Foil.
    On my accent finger I used one coat of PVA Glue before applying three thin coats of Sally Hansen Gilded Lily. I used one top coat of No7 Stay Perfect.

    TwitterBloglovin’Tumblr

    Share:
    Freehand, Glitter, Uncategorised

    Happy Easter Again!

    More Easter nails today! I couldn’t resist trying on this sugary sweet combination today and I added a fishtail accent which I absolutely love! I can’t believe I’ve never tried it out before.
    The clocks jumped forwards in the UK last night and the sun was shining until about 7pm today which was just amazing. I am SO ready for summer to come but until it does I’ll be wearing plenty of pastels on my nails to remind myself it’s not too far away!
     

    The base colours (thumb to pinky) are:
    Sally Hansen Green Tea
    China Glaze Fade into Hue
    China Glaze Pink-ie Promise
    Each nail is topped with two coats of Sonnetarium Samurai Princess.
    For the fishtail accent, I used CG Tart-y for the Party, SH Green Tea and CG Pink-ie Promise.
    Finally, I used two coats of No7 Stay Perfect Top Coat.

    TwitterBloglovin’Tumblr

    Share:
    Freehand, Uncategorised

    Happy Easter!

    Happy Easter weekend everyone, I hope you’re all having yourself a great one. I think four days off work was just what the blog doctor ordered for me. I’ve given my room a good spring clean, finally got around to designing and ordering the business cards that have been on my to-do list for two months and, best of all, I’ve had some time to sit down and do some real nail art!
    As much as I love pretty patterns and gradients and glitter, that stuff can get boring and my real love when it comes to nail art is themed freehand stuff like this and I think you’d all probably agree with me on this one!

    My base colours (from thumb to pinky) are 
    Barry M Textured in Atlantic Road
    Barry Textured in Station Road
    Sally Hansen Crinoline
    Barry M Textured in Ridley Road
    NYC Expert Last in Lavender Cupcake
    Other colours I used include Born Pretty Sky Blue and Matt White, Barry M Dragon, Rimmel Grey Matter, NYC Water Street Blue and NYC Wild With Passion.
    Finally I added a top coat of Seche Vite, which is available from Beauty Encounter, followed by a coat of Rimmel Matte Finish. This  has had an interesting effect on the textured polishes, they still look kind of textured but the effect isn’t as pronounced.

    TwitterBloglovin’Tumblr

    Share: