Follow:
Browsing Tag:

Sally Hansen

    Glitter, Uncategorised

    The Lady is a Vamp

    I don’t really know what came over me but today I attempted, once again, to water marble… voluntarily! Once again I was reminded how much I hate it so this will probably be it for a while.
    I picked up this pretty black glitter for £1 is Store Twenty One today, it’s Thunderstorm from BYS. I was expecting it to be a pretty glitter that I could layer over black polish but it turns out you don’t even need a base colour so I was pretty happy about that. It’s even prettier than it looks in the bottle too, I think it’s going to see a lot of love from me.

    I used Sally Hansen Blackout, Rimmel Heart on Fire and BYS Thunderstorm as my base colours. The water marble was created using Heart on Fire and Blackout. Finally I finished it all off with a coat of Essence Better Than Gel Nails.

    TwitterBloglovin’Tumblr

    Share:
    Glitter, Studs, Uncategorised

    Half/Stud/Half

    I know it’s been quiet around here this week. I’ve been more than a little bit poorly but I’m on the mend now and slowly getting back in to the swing of things. I’ll start with something sweet… pastels!

    The colours here are Sally Hansen Green Tea, Sally Hansen Dorian Gray, NYC Raindrop, NYC Lavender Cupcake with Sonnetarium Lenten Rose on the ring finger.
    I painted them all on as skittles then added a top coat to make them dry nice and quickly. Once the base colours were dry, I used scotch tape to mark a clean line halfway down each nail. Then I painted a second colour over the top one nail at a time and removed the tape straight away. I waited for that to dry and added a final top coat, attaching the studs while that was still wet.

    TwitterBloglovin’Tumblr

    Share:
    Studs, Tutorial, Uncategorised

    Sally Hansen Street Style Tutorial: Studs n’ Chains

    This month, Sally Hansen’s I ♥ Nail Art theme is Street Style and the call for inspiration is ‘heavy metal, pop art and graffiti glam’. I stopped reading at heavy metal… it’s got to be the studs for me!

    Before you start make sure you’ve got everything you need. The only polishes I’m using for this are Sally Hansen Black Out and Dries Instantly.
    I’m using some gold bullion for the studs, an old necklace for the chains, a pair of pointy tweezers, a nail art brush and a few toothpicks.

    I’ve got a selection of chains which I’ve collected just for nail art purposes! Some of them are necklaces I’ve tired of and instead of throwing them out I’ve done a bit of upcycling and started wearing them on my nails. Others are ones I’ve picked up in the cheap in stores. If you need a chain, just pop in to places like Claire’s to see if there are any chains thin enough for your nails.

    To avoid any smudges on your polish, before you even paint on the base colour measure and cut off a piece of chain for each of your nails. Just rest it across to get an idea of how much you need, then snip it off with scissors, wire cutters or anything else that will do the job!

    Start with a base of Sally Hansen Black Out and let it dry.

    Using the nail art brush, paint on a line of clear nail polish where you want to stick the chain and move swiftly on to the next step…

    Place the chain across your nail and pat it down in to the polish to make sure it’s really stuck there!

    I always use a toothpick to place the studs. I dip the end in a bit of clear nail polish to make it sticky and use it to pick up the fiddly little beads.

    Add a coat of Dries Instantly and place the studs on to your nail while it’s still wet.

    Finally, when everything is completely dry, dip a small paintbrush in acetone and sweep it along your cuticle line for a nice clean finish.
    Don’t forget to enter your own Street Style looks over at Sally Hansen’s Facebook Page. As always, there’s $500 and a trip to NYC up for grabs. I’d also love it if you tag me on Twitter or Instagram (@thesammersaurus) so I can see your entries too!

    TwitterBloglovin’Tumblr

    Share:
    Uncategorised

    The Great Gatsby Inspired Nail Art

    Since I first saw a trailer for The Great Gatsby I’ve been completely besotted. I like Baz Luhrmann and I love Leonardo DiCaprio (who doesn’t amirite?!) so I can’t wait to see the movie. I’m a sucker for beautiful looking films and I’m sure this one won’t disappoint in the aesthetics department. The posters alone are gorgeous enough and you know I can’t resist a good gold and black combo so today’s nail art is inspired by the amazing art deco pattern plastered all over the artwork for the movie.

    For the base I used one coat of  Barry M Gold Foil and one coat of Sally Hansen Gilded Lily to get the luxurious, glistening gold look. I painted on a thin coat of Sally Hansen Dries Instantly and waited about 15 minutes before applying striping tape where I wanted the gold to show through. Next I painted W7 Black over the top and swiftly removed the tape. There’s a full striping tape tutorial here which explains in more detail. Finally I topped it off with another two coats of Dries Instantly to smooth everything over.

    TwitterBloglovin’Tumblr

    Share:
    Glitter, Swatch, Uncategorised

    L’Oreal Confetti Top Coat Swatch

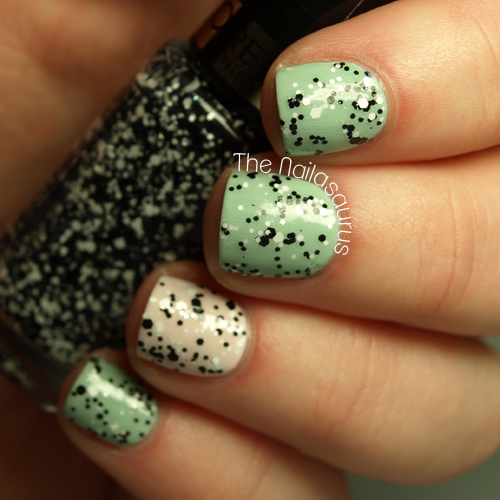
    L’Oreal Confetti is a polish I’ve been wanting for quite a while now but for the longest time I couldn’t find it on shelves anywhere… I was obviously late to the party! I finally found some in Boots last week and promptly picked up two bottles. In hindsight, maybe I was a little overexcited at the time and I realise now I’ll never need two bottles. It’s just always nice to have that spare one there, you know, just in case!
    Confetti is a pretty topper that contains two sizes of hexes in matte black in white glitter. There’s also a very, very subtle shimmer in the clear base. I used two coats but it looks just as good after one. It’s probably not one I’d normally wear on every finger like this but you all know how much I like a good glitter accent nail and this polish will be just perfect for that.

    This swatch is two coats of L’Oreal Confetti over Sally Hansen Green Tea and Sally Hansen Crinolin all topped with Sally Hansen Dries Instantly.

    Does black and white glitter get your thumbs up? Or do you prefer to keep your manis colourful?

    TwitterBloglovin’Tumblr

    Share:
    Tutorial, Uncategorised

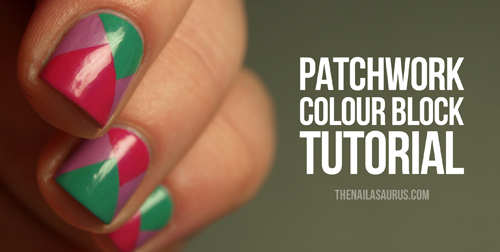
    Patchwork Colour Block Tutorial

    A little while ago, Sally Hansen got in touch to see if I’d like to be a Nail Art Ambassador for their I ♥ Nail Art campaign. As you’ll know if you’ve been reading for a while, my undying love for Sally Hansen is no big secret around here so of course I was more than happy to get involved!

    Each month there’s a new theme and you can submit your nail creations for the chance to win amazing prizes. I’ll be bringing you two tutorials every month and for the month of April, the theme is Colour Blocking!

    Before you start, make sure you have everything you need:
    Three (or more!) colours. I’m using Back to the Fuschia (what an amazing name!), Lively Lilac and Mint Sprint.
    A quick drying top coat. I’ve picked Dries Instantly for this one.
    Some Scotch tape, or anything similar. I decided to invest in one of those nifty gadgets which slides over your knuckles and dispenses it in little strips. If you’re cutting from the roll it’s a good idea to snip off some little strips before getting stuck in to the painting.
    Start by painting on your base colour, this is the colour that will show at the sides. At this point I apply a top coat to make it dry nice and quickly. 
    Sticking scotch tape to wet nails is a big no no so wait until it’s completely dry before moving on. I normally give it about 15-30 minutes just to be sure.

    Apply one piece of scotch tape diagonally across your nail…

    … and then another at a right angle to that piece. You want to be able to see an exposed patch in an off centre triangle shape at the bas of your nail.
    Make sure your tape is pressed down firmly so that absolutely no polish seeps underneath. You can use a pair of tweezers to make things a bit easier.

    Paint your second colour on to the exposed triangle and immediately peel off the tape… very slowly and carefully!
    Once that patch is mostly dry, I apply another top coat to speed up the drying but still wait about 15-20 minutes before applying any more tape.

    Apply the second batch of tape in the same way. First with a strip diagonally across your nail (this time you can use the patch that’s already there as a guide), then another headed towards the tip of your nail.

    Paint on colour number 3 and peel off the tape.

    Finally, add one last top coat and use a small paintbrush dipped in acetone to clean up any mess around your cuticles!
    You can enter your own colour blocking manis in to Sally Hansen’s I ♥ Nail Art competition and check out the gallery for plenty more inspiration here.
    Although I kept the base coat the same on every nail, I alternated the colours I used to paint on my patches. There are so many ways to make this mani your own. Your can mix up your base colours, try out some different patches and even experiment with the angles!

    TwitterBloglovin’Tumblr

    Share:
    Freehand, Uncategorised

    Penspired

    When I was out shopping on the weekend, I spotted a pen with a funky chevron pattern and of course, the first thing that ran through my brain was ‘I can put that on my nails!’. I bought the pen solely for that reason! I actually only planned to paint a chevron and maybe a few stripes on each nail but I may gotten a little carried away.

    The colours I used are Barry M White, W7 Black and Sally Hansen Fairy Teal. I varied the base colour on each finger and painted on the details with a nail art brush. True story.
    It’s all top coated with Sally Hansen Dries Instantly.

    Share: