Follow:
Browsing Category:

Nail Art

    Beauty, Gradient, Makeup

    Beauty and the Beach Part 2!

    Last year I entered Travel Supermarket’s Beauty and the Beach competition and this year I’ll be joining the judging panel as the judge of the nail art category. Pretty cool huh?! I’m so excited to see all the nail art entries and I’m sure I’ll be finding plenty of inspiration for the coming summer months.

    Beauty and the Beach is a competition for bloggers and to enter all you have to do is show off your best holiday hair, nail and make-up looks. Nothing we bloggers don’t do every single day! You can enter all 3 categories or just one or two. There will be a winner selected in each category who will receive a £500 cash prize and there’s one overall prize which will go to a blogger who entered all three and that prize is £1500… cold hard cash! The competition opens today so I’m going to show you my own holiday looks, run through the rules and tell you how you can enter.

    The Nails
    Evenings are my favourite part of any tropical holiday and I love nothing more than sunset on the beach. I wanted to try and recreate the colours of a sunset over the sand so of course it had to be a gradient!
    The base colour is NYC Lexington Yellow and I created the gradients using Rimmel Urban Princess and Barry M Papaya following this tutorial. The glitter accent on my ring finger is Lac Attack’s Felix Felicis and I topped the whole thing off with a coat of Seche Vite.

    The Make-Up
    When I think of holiday make-up my mind wanders straight to bronze and gold so of course that’s where I started. I added the green highlight in the hopes of bringing out the green flecks in my eyes that sometimes make an appearance when the sun’s out.
    To create this look I used FrontCover’s Moondust Collection, Barry M Gel eyeliner, a slick of Avon SuperExtend mascara and a sprinkling of individual lashes just at the outer corner for a flirty flutter. I normally wear strip lashes but when I’m on holiday I like to keep my make-up as light as possible – strip lashes do not feel light!

    If you want to enter the competition yourself (why wouldn’t you?!) here’s how:
    1. Upload images of your best holiday hair, nails and make-up with an explanation of how you achieved the look. You can enter all three categories, or just one or two.
    2. Make sure you mention the competition page within your post:
    http://www.travelsupermarket.com/c/holidays/beauty-and-the-beach-two/
    3. Nominate 5 fellow bloggers that you think will be up to the challenge and let them know via Facebook or Twitter (#beautyandthebeach2).
    4. The closing day for entries is 5th June 2013 and you can let us know you have entered by one of the following:
    • Email beautyandthebeach@travelsupermarket.com with a link to your post.
    • Tweet @travelsupermkt with the hashtag #beautyandthebeach2 with a link to your post.
    • Or, tag the TravelSupermarket.com Facebook page in a post linking to your blog post that you are entering.
    5. For each category, the judges will select a winner from their respective category of hair, nails and make-up, each winner will win £500.
    6. For the overall winner, the three judges will collectively decide on who has achieved the best holiday look. The winner will win £1,500 in cash.

    I think that about covers everything but full terms and conditions and more details can be found at the Travel Supermarket site here.

    Good luck everyone!

    Share:
    Freehand, Review, Uncategorised

    Barry M Nail Art Pens Review

    Many of you will have heard the exciting news this week that Barry M are launching some new products this month and amongst them are nail art pens. I knew about these a little while back because I was asked to create some nail art using the pens for the print advert but I had to keep it a secret which wasn’t easy!
    Before these I’d never used nail art pens, always favouring brushes, but I got on with the pens just fine and the mess on my desk was much more contained than when I use brushes!

    To get the paint flowing you have to press the nib down on the desk (I put a piece of plastic down first because some of it will get on your surface) until it starts flowing. The paint comes down the edges and through the middle of the nib but sometimes a little too much makes its way down the sides and you have to wipe it off. This wasn’t a huge deal for me because I’m used to using brushes which have to be cleaned off constantly. 

    You have to make sure your base colour is completely dry before you go for it with these pens. I jumped the gun and ending up dragging away the polish underneath so I had to start over. I also noticed that the paint crackles if you paint it on to wet nail polish, you can kind of see what I mean on the square design on my ring finger.
    The nibs of the pens look a lot like like felt tips but are actually made of solid plastic which makes them very durable. I slammed these down on my desk more than a few times when I was being a little over zealous but it didn’t do any damage to the nibs, they’re super tough.
    I’m pretty sure it’s not nail polish inside. By that I mean they haven’t just poured their Black nail polish in to a nail art pen. It’s something between nail polish and paint because obviously it has to be runny enough to flow smoothly out of the pens. Whatever it is, the consistency is perfect and with a top coat it will last as long as your nail polish.
    I think I’ll get the most use out of these when I’m doing french tips. Do you ever paint on tips and find yourself with a big bump at the end of your nails? I do all the time! These won’t give you that bump, the paint is so smooth and you can go over the same area as many times as you like without it ‘building up’ and getting all lumpy.

    These nail art pens will be available in Superdrug stores from April 10th and Boots stores from April 17th. The RRP is £4.99 each.
    They’ll also be launching on BarryM.com from April 10th.
    Share:
    Freehand, Uncategorised

    Feeling Like A Sir

    This week I found a gem of a bargain when I was in Asda. Don’t judge me when I tell you I buy clothes and jewellery from there on a regular basis! I was browsing the girls jewellery, as you do, and I spotted a little packet of moustaches. There was no indication on the packaging as to what they were but using my detective skills I quickly deduced that they were in fact, as I had immediately suspected, nail decals! Hidden away amongst the pink clip in hair streaks and plastic tiaras!
    They were a complete steal at £1.50 for 48 stickers and they’re absolutely great. They’re kind of foamy and the adhesive layer is really thin so they’re easy to handle and stick to the nails really well. The first time I wore them, I used a top coat and they were unmovable. This time around I didn’t and the sticker slid off after about 12 hours of wear so go for a top coat if you’re going to try them yourself. 
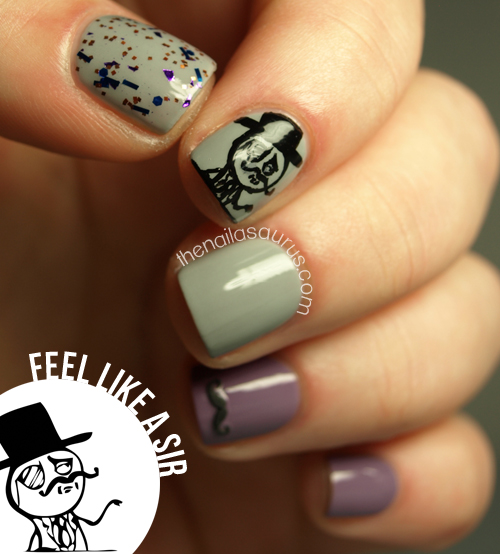
    The smallest design, the curly one, immediately made me think of the ‘Feel Like A Sir‘ meme so of course I had to put it on my nails!

    I used Sally Hansen Dorian Grey and A-England Guinevere as my base colours with a coat of WellNails Rock In The New Year on my thumb. The Mo’ decal is, as previously stated, from Asda and I painted on the Sir using a nail art brush and acrylic paint.
    Everything is topped with a coat of No7 Stay Perfect Top Coat except for the sticker, I put that on after the top coat.

    TwitterBloglovin’Tumblr

    Share:
    Studs, Uncategorised

    Thnks Fr Th Mmrs: Studded Nails

    Sticking with the reminiscent theme this week I’ve recreated another mani from the archives. I can still remember the day I posted this mani first time round in great detail. Like, crazy amounts of tiny details! It was November 3rd, I was in the middle of the 31 Day challenge and I was behind schedule. I didn’t have a post ready for that day which was ‘Day 25: Inspired by Fashion‘ and I had plans for the day so I had to wake up super early and start scouring the web for inspiration. I came across a studded Michael Kors dress and the rest is history. You can see the original post here
    What I thought was just another 31 Day Challenge post blew up bigger than I could have imagined, it just exploded! If people ask me whether I can pinpoint a particular moment when my blog went to ‘the next level’, I tell them it was this manicure on November 3rd 2011. I guess it was something that a lot of people hadn’t ever seen before and that’s what made it special and worth sharing. It was even shared on Michael Kors’ official Facebook and Twitter a few days later. I was crying tears of joy and disbelief at that point. Studded nails… thanks for the memories!
    To this day, it remains the second most viewed post on my blog (after the gradient tutorial). Were any of you guys reading way back when I posted this in 2011?

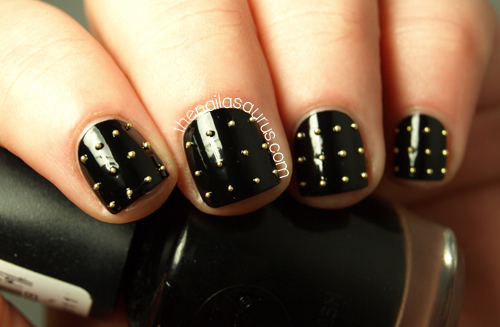
     I was rocking the longer nails back then. I loved them at the time but nowadays I wear my shorties like a badge of honour! I’ve gone for less studs and a slightly different arrangement but I think the rock chick vibe still comes across. I used the same base colour, W7 Black, although this is a different bottle. I get through black nail polish like it’s going out of fashion and I always end up repurchasing the W7.

    In the original photo I used a top coat over the studs and amazingly, the colour stayed on the studs! This time around, I skipped the top coat before the pictures because I was scared of the gold colour running and I was right to do so. When I applied a top coat after the pictures, the studs turned silver.

    If you’re gonna try studs, I’d recommend the ones from Viva La Nails. They’re the only ones I’ve ever used that don’t lose their colour with a top coat.

    TwitterBloglovin’Tumblr

    Share:
    Glitter, Stamping, Uncategorised

    The Nailasaurus is 3!

    3 years ago, on this very day, I sat down at my computer, signed up to Blogger and created this blog. I didn’t have big dreams for it at all, at the time it was just my little contribution to the very small online community of people who were passionate about polish and quite honestly a great way to procrastinate on my school work! 
    Today it’s a huge part of my life and I could never have imagined it would become what it is today. I feel like I owe a lot to this blog and I know my life would be very different today if I hadn’t spent the last three years diving head first into my nail art obsession! Of course, I owe all of this to you guys. Thank you so much for reading, commenting, sharing and just generally being an awesome bunch of readers!
    I thought I’d take a look back through the archives and dig out an early mani to recreate it and I’ve gone with the ‘Mint Mesh‘ from July 2010, about 3 months in to my blog. Back in the day I used to post exclusively stamping manicures on a daily basis. I didn’t start experimenting with other nail art techniques for months and it was almost a year before I tried my first freehand nail art. It’s good to see the immense improvement in the photography and my neater nails and cuticles.

    This time around I used Sally Hansen Green Tea as my base colour, then stamped on the fishnet design from Konad Plate M57 using Barry M Gold Foil.
    On my accent finger I used one coat of PVA Glue before applying three thin coats of Sally Hansen Gilded Lily. I used one top coat of No7 Stay Perfect.

    TwitterBloglovin’Tumblr

    Share:
    Freehand, Glitter, Uncategorised

    Happy Easter Again!

    More Easter nails today! I couldn’t resist trying on this sugary sweet combination today and I added a fishtail accent which I absolutely love! I can’t believe I’ve never tried it out before.
    The clocks jumped forwards in the UK last night and the sun was shining until about 7pm today which was just amazing. I am SO ready for summer to come but until it does I’ll be wearing plenty of pastels on my nails to remind myself it’s not too far away!
     

    The base colours (thumb to pinky) are:
    Sally Hansen Green Tea
    China Glaze Fade into Hue
    China Glaze Pink-ie Promise
    Each nail is topped with two coats of Sonnetarium Samurai Princess.
    For the fishtail accent, I used CG Tart-y for the Party, SH Green Tea and CG Pink-ie Promise.
    Finally, I used two coats of No7 Stay Perfect Top Coat.

    TwitterBloglovin’Tumblr

    Share:
    Freehand, Uncategorised

    Happy Easter!

    Happy Easter weekend everyone, I hope you’re all having yourself a great one. I think four days off work was just what the blog doctor ordered for me. I’ve given my room a good spring clean, finally got around to designing and ordering the business cards that have been on my to-do list for two months and, best of all, I’ve had some time to sit down and do some real nail art!
    As much as I love pretty patterns and gradients and glitter, that stuff can get boring and my real love when it comes to nail art is themed freehand stuff like this and I think you’d all probably agree with me on this one!

    My base colours (from thumb to pinky) are 
    Barry M Textured in Atlantic Road
    Barry Textured in Station Road
    Sally Hansen Crinoline
    Barry M Textured in Ridley Road
    NYC Expert Last in Lavender Cupcake
    Other colours I used include Born Pretty Sky Blue and Matt White, Barry M Dragon, Rimmel Grey Matter, NYC Water Street Blue and NYC Wild With Passion.
    Finally I added a top coat of Seche Vite, which is available from Beauty Encounter, followed by a coat of Rimmel Matte Finish. This  has had an interesting effect on the textured polishes, they still look kind of textured but the effect isn’t as pronounced.

    TwitterBloglovin’Tumblr

    Share: