Follow:
Browsing Category:

Halloween

    Beauty, Halloween, Makeup

    Halloween Makeup: Semi-Realistic Skull Inspired by Brianna Fox

    Halloween Skull Makeup

    So here’s something a little different from me today… a makeup look! With Halloween less than week away, I wanted to get in a trial run before the big night. My look is a pared back version of Brianna Fox’s Skeleton Tutorial from last year which I’ve included below – seriously worth watching her amaze tutorials! On the night, I will include the cracks, add some false eyelashes and spend a bit more time blending the shades around my eyes for a little extra glam. I also think there’s a bit of room for improvement on my ‘teeth’! Read more

    Share:
    Halloween, Nail Art

    18 Halloween Nail Art Ideas: 2016 Edition

    easy-halloween-nail-art-ideas

    Safe to say, it’s become quite the tradition for me to create a wheel of Halloween nail art ideas this time every year (you can see last year’s here and the year before here). This year, I still included a few of my favourites like ‘Scene of the Crime’ and ‘Broken Glass’ but there’s plenty of new material to keep you going.

    Before we start, just a quick to a shout out to the Dance 20 Detail Brush for the freehand work and Barry M Black Forest for all things black. So, let’s get on to the good stuff… Read more

    Share:
    Freehand, Halloween, Nail Art

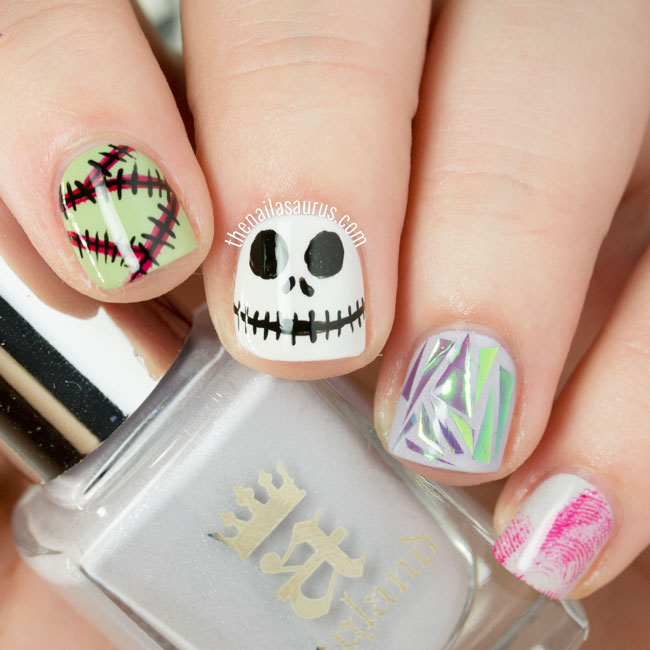
    Happy Halloween! Skittlette Nail Art

    Just a quick post to show you my official Halloween nails for this year. It was impossible choosing just one design from the 18 halloween nail art looks I showed you last weekend so I went wild with it and picked my favourites.

    These nails have held up since Wednesday night which is possibly a record for me. I had to do them a while ahead of the holiday as it’s been a busy few days and I knew I wouldn’t get a chance otherwise. My index finger is chipped very slightly on the corner but fingers crossed everything will stay put until the evening’s up! Read more

    Share:
    Halloween, Nail Art

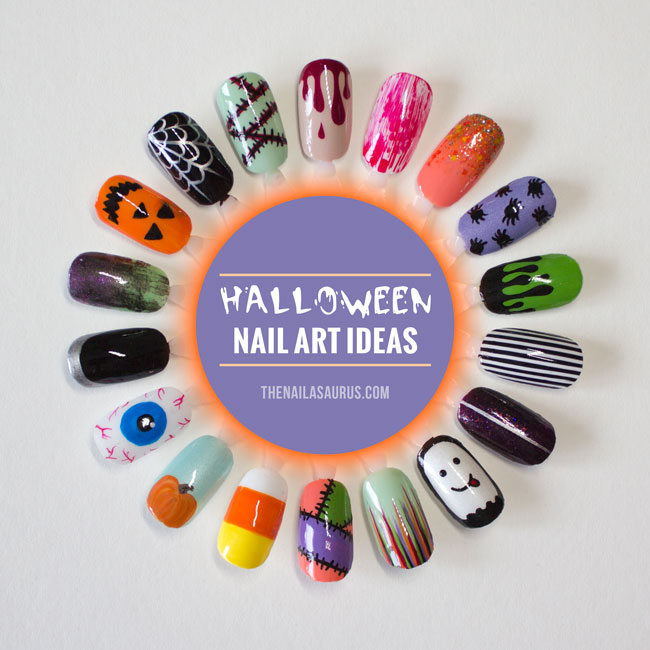
    18 Easy Halloween Nail Art Ideas

    Easy Halloween Nail Art Ideas

    Halloween is just around the corner and as much as I wish I could spend every hour until then painting spooky designs on to my nails, real life’s just going to poke its nose in and get right in the way! So that I can still have my fun, I’ve put down 18 of my favourite Halloween nail art designs on to a nail wheel.

    All 18 designs are quite easy as long as you know your way around a nail art brush. However, some do require more patience that others (hello rhinestones!). So, what are you waiting for, pull out all of your creepiest colours and get stuck in! Read more

    Share:
    Freehand, Glitter, Halloween, Nail Art, Uncategorised

    Nailvengers Assemble: Halloween Nail Art

    Halloween Nail Art // The Nailasaurus

    Happy Halloween all! I’ve teamed up with the Nailvengers (Amelia, Allie, Alice and Lucie) today for my first and final Halloween look. I’m sorry if you might have been expecting something a bit more adventurous considering I had 18 designs to choose from, but I was in a bit of a rush and blood drips are always going to be my go-to Halloween design! This time around, I tried to 3D-ify the drips with some highlighting and contouring with moderate success!

    This glitter polish caught my eye half way through the paint job. It’s an untried that’s been sat on my desk just waiting to be used. My eyes skimmed over it and just thought ‘the is PERFECT for Halloween!’, so I removed the polish that was already there and applied the glitter instead!

    For the blood drips, I painted a base colour of Barry M Lychee, then freehanded on the drips using Rimmel Heart on Fire with a nail art brush.

    I mixed a little bit of black polish in with the red to paint the shadows, then mixed a little bit of red with white for the highlights/reflections.

    The glitter is W7 Lava Flow. I used about four (really thin) coats to get full opacity but you could just apply two over white for a similar effect.

    It’s all topped off with two coats of Glisten & Glow HK Girl.

    Halloween Nail Art // The Nailasaurus

    W7 Lava Flow Halloween Nails // The Nailasaurus

    Halloween Nail Art // The Nailasaurus

    Halloween Nail Art // The Nailasaurus

    Share:
    Halloween, Nail Art, Uncategorised

    18 Easy Nail Art Ideas for Halloween

    Easy Halloween Nail Art

    October has completely flown by and I can’t believe Halloween is less than a week away! I haven’t posted a single Halloween nail design yet this year so I wanted to round up a couple of easy designs that anyone can do for the holiday.

    I started on this nail art wheel last week and just had a few details to finish off last night, when I spilled a whole lot of nail polish remover over the whole thing. Despite my best efforts, I couldn’t rescue it so I had to start over! I think the second attempt is better than the first anyway since I knew exactly what I was doing this time around. I also made my way through 5 episodes of Once Upon a Time while doing it so it wasn’t a complete disaster!

    Don’t forget to tag me @thesammersaurus and use the hashtag #looknailasaurus if you recreate any of these designs so I can see!

    Easy Halloween Nail Art

    No Nail Care

    Start with a base coat that matches your skin tone or even leave your nails bare. Use a deep red to give the effect that you’re bleeding straight out of your cuticles.
    Polishes Used: Barry M Lychee, Revlon Bordeaux

    Frankenscars

    Over a green base, paint some red lines using a nail art brush, then add the stitching using black paint or polish.
    Polishes used: Nicole by OPI I Shop Mintage, Barry M Red, Black Acrylic Paint

    Catching Flies

    Paint a few silver lines coming out from the corner of your nail. Connect them up with some ‘dips’ to create a cobweb.
    Polishes Used: W7 Black, A-England Excalibur Renaissance

    Halloween Nail Art For Beginners

    Happy Jack

    Paint your nails with a bright orange polish and add details
    Polishes Used: Essie Fear & Desire, Black Acrylic Paint

    Distressed Gradient

    There’s a tutorial for the distressed look at Chalkboard Nails.
    Polishes Used: piCture pOlish Tail Feather, piCture pOlish Hussy, A-England Dorian Gray

    Morticia

    Named so because it’s exactly what Morticia Addams would be rocking on her nails! Start with a black base coat and freehand on the ruffian edge with a silver chrome polish.
    Polishes Used: W7 Black, A-England Excalibur Renaissance

    Easy Halloween Nail Art Ideas

    Eye See You

    I believe this design is originally by Wah! Nails. Over a white base colour, start with the largest blue circle as the pupil. Draw a smaller black circle inside it as the iris and add a small whit dot just to the edge of the iris. Using a thin brush, add some wiggly veins creeping in from the edges.
    Polishes Used: Graffiti Nails Ice White, Barry M Malibu, W7 Black, Barry M Red

    Pumpkin Patch

    Over a light base colour, paint on a pumpkin shape at the very base of your nail in orange polish. Mix the orange polish with a little bit of yellow to add some highlights.
    Polishes used: Barry M Meadow, Essie Fear & Desire, NYC Lexington Yellow

    Candy Corn

    Paint your nails white and wait for it to dry. You can either freehand on the blocks of yellow and orange or use scotch tape to mark off each section as you go for a super crisp edge.
    Polishes Used: Graffiti Nails Ice White, Essie Fear & Desire, NYC Lexington Yellow

    Halloween Nail Ideas

    Patchwork

    Tutorial here
    Polishes used: China Glaze Mimosa’s Before Mani’s, Rimmel Keep Calm and Party, Sally Hansen Grass Slipper

    Halloween Waterfall

    Tutorial here
    Polishes Used: Nicole by OPI I Shop Mintage, Revlon Bordeaux, Essie Fear & Desire, W7 Black, Rimmel Keep Calm and Party

    Goofy Ghost

    Start with your white base colour and paint a black frame around your nail using a nail art brush. Near the cuticle, add a wavy line and fill in any gaps. To finish up, add some dots for eyes and and pokey tongue.

    Polishes Used: Barry M Pearl, W7 Black

    Halloween Nail Art

    Hallowen Glitter

    If you’re in a rush, a spooky glitter will do the job! Add some simple details using silver polish.
    Polishes Used: China Glaze Cowgirl Up, Orly Fowl Play, A-England Excalibur Renaissance

    Pinstripes

    Paint a white base colour and add a top coat to speed up drying time. Use striping tape to mark off your pinstripes, paint over everything in black and immediately remove the tape. Perfect pinstripes every time!
    Polishes Used: Graffiti Nails Ice White, W7 Black,

    Toxic Waste

    Start with your slimy green base coat and paint on the drips using a small nail art brush.
    Polishes Used: Sally Hansen Grass Slipper, Black Acrylic Paint

    Halloween Nail Art

    Crawlers

    Use a large dotting tool to create the ‘bodies’ and add the 8 legs to each using a little nail art brush.
    Polishes Used: piCture pOlish Eerie, W7 Black.

    GlitterBomb

    Just go nuts with glitter! Use a make-up sponge to create the gradient effect.
    Polishes Used: Barry M Papaya, Sally Hansen Sparktacular, Lac Attack Weasley’s Wizard Wheezes

    Dexter’s Lab

    This was a bit of a fluke! I used the distressed technique with red over white and got this amazing streaky look. I don’t know if it was the brush or polish but my gosh, it works!
    Polishes Used: Graffiti Nails Ice White, Barry M Red

    Share:
    Gradient, Halloween, Uncategorised

    Halloween Grungy Gradient

    Here’s my second Halloween manicure of the day! I saw this look on Brit Nails last week and thought it was just perfect for the holiday. The technique for the distressed look comes from Chalkboard Nails so you can jump over there to read all about it. It was a bit trickier than it sounds – I messed up at first when I didn’t wipe the brush enough before painting on to my nail but I got the hang of it after a few tries.

    I sort of wish I’d used a more icky green than this but I still like it. Mint just isn’t as menacing as slime green!

    I used NYC Mint Macaroon as my base colour and created the gradient (tutorial here) using Collection 2000 Minx.

    For the distressed look I used A-England Dorian Gray and followed Chalkboard Nails’ instructions on the technique.

    Finally, I used two coats of Color Club Top Coat to smooth things over.

    Share: