Follow:
Browsing Tag:

Orange

    Uncategorised

    OPI Neons with Nailed Kit Totally Tribal Decals

    OPI Neons with Tribal Nail Art | The Nailasaurus | UK Nail Art Blog

    After what has felt like a nail art dry spell, I finally have a steady trickle of ideas coming in. I think it’s thanks to all the new summer releases that we’re seeing at the moment. I’ll start today with a few from OPI’s Neon collection and a preview of some upcoming Nailed Kit decals.

    I was lucky enough to find the Neon shades in my goody bag from Coty’s summer nail preview on Thursday. I made my way to London to meet up with Alice and Allie and we headed to the event together. I’m a bit of a country bumpkin so I normally avoid London at all costs but since it was solely a nails event and some of my favourite brands (can you say Sally Hansen and NYC) to boot, I thought it would be worth the adventure and it totally was! I had a great day talking to the ladies at Coty and met the bloggers behind Dahlia Nails too, so there was more than enough nail talk to go round.

    The Neon shades I used here are Life Gave me Lemons (Yellow, 2 coats), Juice Bar Hopping (Orange, 2 coats) and Hotter Than You Pink (Pink, 2 coats) with one coat of the Put a Coat On! white base coat underneath. I had a little bit of streaking with the neons on the first coat but that smoothed out with the second as long as I left plenty of drying time between layers.

    This is my first time trying Nailed Kit’s decals so I wasn’t sure how it was going to go, but it turned out to be a successful attempt. The instructions said to use them like temporary tattoos – place them where you want them on the nail and apply a wet piece of cotton/tissue to the back – but this way didn’t work for me. The decal came away from the backing perfectly but I just couldn’t get the decal right where I wanted it. I tried the traditional way of dipping them in to water and dislodging the decal from the paper, then placing them on to the nail which also worked and I much preferred doing it that way.

    This set is Totally Tribal and will be available on their website in June.

    OPI Neons with Tribal Nail Art | The Nailasaurus | UK Nail Art Blog

    OPI Neons with Tribal Nail Art | The Nailasaurus | UK Nail Art Blog
    OPI Neons with Tribal Nail Art | The Nailasaurus | UK Nail Art Blog

    OPI Neons with Tribal Nail Art | The Nailasaurus | UK Nail Art Blog

    OPI Neons with Tribal Nail Art | The Nailasaurus | UK Nail Art Blog

    Where to buy OPI Neon

    RRP £11.95. Available in department stores and salons.
    Currently £6.93 each at Beauty Bay with free delivery
    Share:
    Glitter, Gradient, Halloween, Uncategorised

    Happy Halloween!

    I have two Halloween manicures that I never got around to posting this month so I thought I would smash them both out today while I still have the chance! The second look will be coming later today.
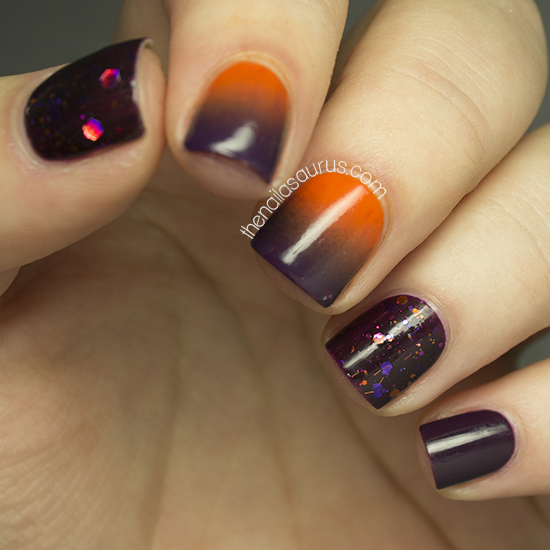
    I got a package from Harlow and Co this week and inside I found an amazing Halloween glitter – KBShimmer You Go Ghoul! It’s a black jelly with purple and orange glitter bits of all shapes and sizes. It’s a shade that you could wear all year round unlike some holiday polishes that are really only suitable for 3 weeks out of the year.

    I used two coats of  KBShimmer You Go Ghoul! over one of Barry M Plum for the accent nails.

    The gradient (tutorial here) was created with a base of Essie Fear and Desire and Barry M Plum. Clean up was a bitch on this one! I didn’t use my trusty liquid pallisade to protect my cuticles and the surrounding areas from the Orange polish which is why there’s a bit of staining there.

    I used two top coats of Rica Glossy Glam.

    Share:
    Freehand, Halloween, Uncategorised

    Halloween Patchwork Nail Art

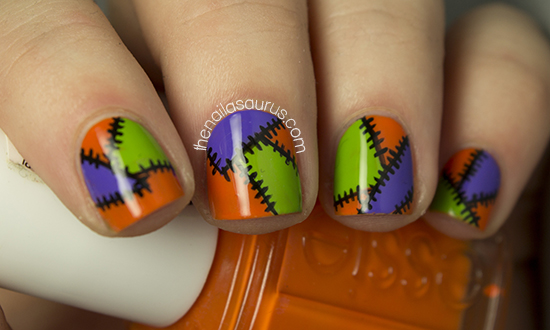
    With Halloween coming up I’ve been racking my brain for nail art ideas so I plucked the spookiest colours I own out of my stash and decided on a patchwork design. This is one of those designs that’s quite versatile and is completely changed by the colour selection. Imagine it in pastel colours with white stitching and tell me it wouldn’t be perfect wear for a baby shower!

    I used Essie Fear and Desire as my base colour and then freehanded on the colour blocks using a nail art brush with Sally Hansen Grass Slipper and Models Own Pukka Purple. If you’re not very confident with a brush, you could also use scotch tape to section off the squares and paint in the colour before peeling the tape away.

    For the stitching detail, I used Black Acrylic Paint and a nail art brush. I started by outlining the blocks of colour and then adding the little stitches.

    It’s all topped off with a coat of Color Club Top Coat.

    P.S. I did a tutorial for bloody drips, another look perfect for Halloween, over at Divine Caroline this week. See the full post here.

    TwitterBloglovin’Tumblr

    Share:
    31 Day Challenge, Freehand, Gradient, Uncategorised

    31DC013 Day 22: Inspired by a Song… ROAR!

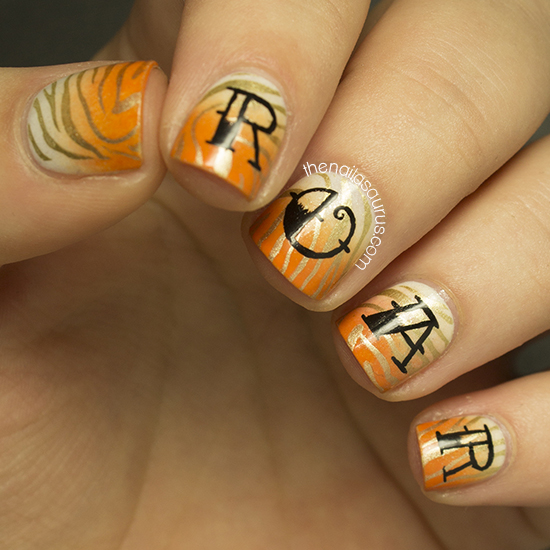
    The song that inspired this manicure was Katy Perry’s Roar. I think Katy Perry is one of the best pop stars ever and she’s well known for her love of nail art so I wanted to create something that would do her justice. This actually turned out way nicer than I expected. With animal print in a busy manicure I always worry about going over the top but I think the background is subtle enough not to overpower the whole mani. I used a lot of different techniques here and it was fun to mix and match within one manicure.
     I got the eye of the tiger, a fighter, dancing through the fire
    Cause I am a champion and you’re gonna hear me roar

    I started with a base of China Glaze Dandy Lyin’ Around. I painted some Liquid Palisade around my cuticles to prevent a big mess and created a gradient using that and Sally Hansen Sun Kissed. There’s a gradient tutorial here.

    Next I stamped on the tiger print from Konad Plate M57 using Barry M Gold Foil.

    Then finally I freehanded on the letters using black acrylic paint and a nail art brush.

    It’s all topped off with two coats of No7 Stay Perfect Top Coat

    See what’s coming next in the 31 Day Challenge 2013!

    TwitterBloglovin’Tumblr

    Share:
    31 Day Challenge, Gradient, Uncategorised

    31DC2013 Day 2: Orange Nails

    This challenge is bringing a few issues to my attention. Today it was the fact that although I have quite a few bottles of orange polish, they’re all pretty much the same shade! I seem to have a real penchant for bright, tangerine orange. I eventually found something a bit different – Barry M Papaya which is a creamy, coral orange and decided to mix the two up in a gradient for Day 2 of the challenge.

    I started with a base colour of Barry M Papaya and created a gradient with Essie Fear & Desire. Click here for a gradient tutorial. It’s all topped off with two coats of Sally Hansen Dries Instantly.

    Find out what’s coming up next in the challenge here!

    TwitterBloglovin’Tumblr

    Share:
    Freehand, Uncategorised, Waterfall

    Fiery Waterfall

    So it seems you guys like the waterfall mani as much as I do! Thank you for letting me know your amazing ideas for colours. I’ve noted them all down and will be trying them out asap!
    The weather today has been insane. I’ve spent half the day moving around at quarter speed and the other half laid down completely still with a fan pointed at me trying to cool off! I’m really not one for this scorching heat… when it gets to May I’m always like, ‘Hmmm this isn’t too bad. Maybe I like summer now’, but as soon as July hits I remember the torture and start counting down the days to October!

    For this nail art I used Sally Hansen Crinolin, a super pale pink, as my base colour then painted on streaks of Barry M Papaya, Essie Lollipop, NYC Lexington Yellow and NYC Full Metal Jacket.
    I topped it with two coats of No7 Stay Perfect Top Coat.

    TwitterBloglovin’Tumblr

    Share:
    Uncategorised

    Banish the Blues: A Very Good Place To Start

    You may have noticed that I love blue! It’s the most popular tag on my blog with a staggering 187 posts which means about 1 in 5 of my posts contain blue nail polish. There’s a whole rainbow out there and I want to take some time to know the rest of it so this week I’m banishing blue from my blog. I’m not allowed to use any blue nail polish for at least 7 days… welcome to ‘Banish the Blues’!
    There are so many polishes in my collection that don’t get used very often at all so I’ve been making more of an effort to look through the whole thing and match up interesting combinations. I think challenging myself to a blue free week is the perfect way to do so. Maybe I’ll even find a new love (but I doubt it!).
    Today I’m starting from the very beginning of the rainbow with red and orange. I don’t think I’ll be going in order for the rest of the week but I figured this would be a good place to start!

    I used Sally Hansen Dorian Grey as my base colour and then took a nail art brush to apply some random triangles with Barry M Passion Fruit (coral) and outline them with a thick border of Barry M Mango (orange). Then I used black acrylic paint to separate the two colours. It’s all finished off with two coats of No7 Stay Perfect Top Coat.

    TwitterBloglovin’Tumblr

    Share: