Follow:
Browsing Tag:

Occasion

    Halloween, Nail Art

    18 Easy Halloween Nail Art Ideas

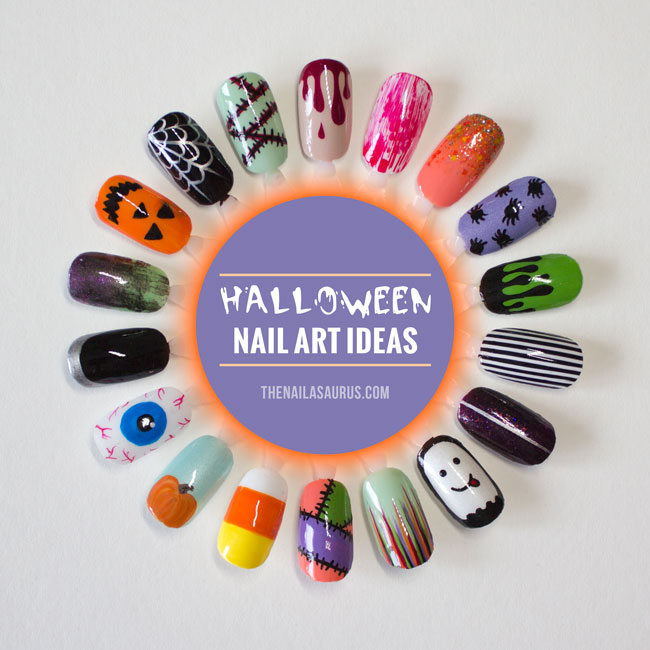
    Easy Halloween Nail Art Ideas

    Halloween is just around the corner and as much as I wish I could spend every hour until then painting spooky designs on to my nails, real life’s just going to poke its nose in and get right in the way! So that I can still have my fun, I’ve put down 18 of my favourite Halloween nail art designs on to a nail wheel.

    All 18 designs are quite easy as long as you know your way around a nail art brush. However, some do require more patience that others (hello rhinestones!). So, what are you waiting for, pull out all of your creepiest colours and get stuck in! Read more

    Share:
    Halloween, Nail Art, Uncategorised

    18 Easy Nail Art Ideas for Halloween

    Easy Halloween Nail Art

    October has completely flown by and I can’t believe Halloween is less than a week away! I haven’t posted a single Halloween nail design yet this year so I wanted to round up a couple of easy designs that anyone can do for the holiday.

    I started on this nail art wheel last week and just had a few details to finish off last night, when I spilled a whole lot of nail polish remover over the whole thing. Despite my best efforts, I couldn’t rescue it so I had to start over! I think the second attempt is better than the first anyway since I knew exactly what I was doing this time around. I also made my way through 5 episodes of Once Upon a Time while doing it so it wasn’t a complete disaster!

    Don’t forget to tag me @thesammersaurus and use the hashtag #looknailasaurus if you recreate any of these designs so I can see!

    Easy Halloween Nail Art

    No Nail Care

    Start with a base coat that matches your skin tone or even leave your nails bare. Use a deep red to give the effect that you’re bleeding straight out of your cuticles.
    Polishes Used: Barry M Lychee, Revlon Bordeaux

    Frankenscars

    Over a green base, paint some red lines using a nail art brush, then add the stitching using black paint or polish.
    Polishes used: Nicole by OPI I Shop Mintage, Barry M Red, Black Acrylic Paint

    Catching Flies

    Paint a few silver lines coming out from the corner of your nail. Connect them up with some ‘dips’ to create a cobweb.
    Polishes Used: W7 Black, A-England Excalibur Renaissance

    Halloween Nail Art For Beginners

    Happy Jack

    Paint your nails with a bright orange polish and add details
    Polishes Used: Essie Fear & Desire, Black Acrylic Paint

    Distressed Gradient

    There’s a tutorial for the distressed look at Chalkboard Nails.
    Polishes Used: piCture pOlish Tail Feather, piCture pOlish Hussy, A-England Dorian Gray

    Morticia

    Named so because it’s exactly what Morticia Addams would be rocking on her nails! Start with a black base coat and freehand on the ruffian edge with a silver chrome polish.
    Polishes Used: W7 Black, A-England Excalibur Renaissance

    Easy Halloween Nail Art Ideas

    Eye See You

    I believe this design is originally by Wah! Nails. Over a white base colour, start with the largest blue circle as the pupil. Draw a smaller black circle inside it as the iris and add a small whit dot just to the edge of the iris. Using a thin brush, add some wiggly veins creeping in from the edges.
    Polishes Used: Graffiti Nails Ice White, Barry M Malibu, W7 Black, Barry M Red

    Pumpkin Patch

    Over a light base colour, paint on a pumpkin shape at the very base of your nail in orange polish. Mix the orange polish with a little bit of yellow to add some highlights.
    Polishes used: Barry M Meadow, Essie Fear & Desire, NYC Lexington Yellow

    Candy Corn

    Paint your nails white and wait for it to dry. You can either freehand on the blocks of yellow and orange or use scotch tape to mark off each section as you go for a super crisp edge.
    Polishes Used: Graffiti Nails Ice White, Essie Fear & Desire, NYC Lexington Yellow

    Halloween Nail Ideas

    Patchwork

    Tutorial here
    Polishes used: China Glaze Mimosa’s Before Mani’s, Rimmel Keep Calm and Party, Sally Hansen Grass Slipper

    Halloween Waterfall

    Tutorial here
    Polishes Used: Nicole by OPI I Shop Mintage, Revlon Bordeaux, Essie Fear & Desire, W7 Black, Rimmel Keep Calm and Party

    Goofy Ghost

    Start with your white base colour and paint a black frame around your nail using a nail art brush. Near the cuticle, add a wavy line and fill in any gaps. To finish up, add some dots for eyes and and pokey tongue.

    Polishes Used: Barry M Pearl, W7 Black

    Halloween Nail Art

    Hallowen Glitter

    If you’re in a rush, a spooky glitter will do the job! Add some simple details using silver polish.
    Polishes Used: China Glaze Cowgirl Up, Orly Fowl Play, A-England Excalibur Renaissance

    Pinstripes

    Paint a white base colour and add a top coat to speed up drying time. Use striping tape to mark off your pinstripes, paint over everything in black and immediately remove the tape. Perfect pinstripes every time!
    Polishes Used: Graffiti Nails Ice White, W7 Black,

    Toxic Waste

    Start with your slimy green base coat and paint on the drips using a small nail art brush.
    Polishes Used: Sally Hansen Grass Slipper, Black Acrylic Paint

    Halloween Nail Art

    Crawlers

    Use a large dotting tool to create the ‘bodies’ and add the 8 legs to each using a little nail art brush.
    Polishes Used: piCture pOlish Eerie, W7 Black.

    GlitterBomb

    Just go nuts with glitter! Use a make-up sponge to create the gradient effect.
    Polishes Used: Barry M Papaya, Sally Hansen Sparktacular, Lac Attack Weasley’s Wizard Wheezes

    Dexter’s Lab

    This was a bit of a fluke! I used the distressed technique with red over white and got this amazing streaky look. I don’t know if it was the brush or polish but my gosh, it works!
    Polishes Used: Graffiti Nails Ice White, Barry M Red

    Share:
    Freehand, Uncategorised

    Happy Saint David’s Day!

    I have never been able to decide whether I’m English or Welsh as my family is English and I was born in England but I’ve lived my whole life in Wales, albeit very close to the border. I tend to float between the two and with my generic British accent, I can pull them both off pretty convincingly! Since it’s Saint David’s Day today, the mood is decidedly Welsh and I’ve created some nail art for the occasion.

    My first finger is the Welsh flag, or at least my simplified interpretation of it. I set down a base of Barry M White and freehanded on the Welsh Dragon using Rimmel Heart on Fire. I added the green in last using Sally Hansen Grass Slipper.
    On my ring finger, I’ve painted a Daffodil – the national flower of Wales. I used Barry M Mist as my base colour and freehanded on the flower using a nail art brush with NYC Lexington Yellow and Sally Hansen Sun Kissed.
    For the remaining fingers, I used Rimmel Heart on Fire, Barry M White and Sally Hansen Grass Slipper.
    It’s all topped off with a coat of Glisten and Glow HK Girl.

    Share:
    Freehand, Glitter, Uncategorised

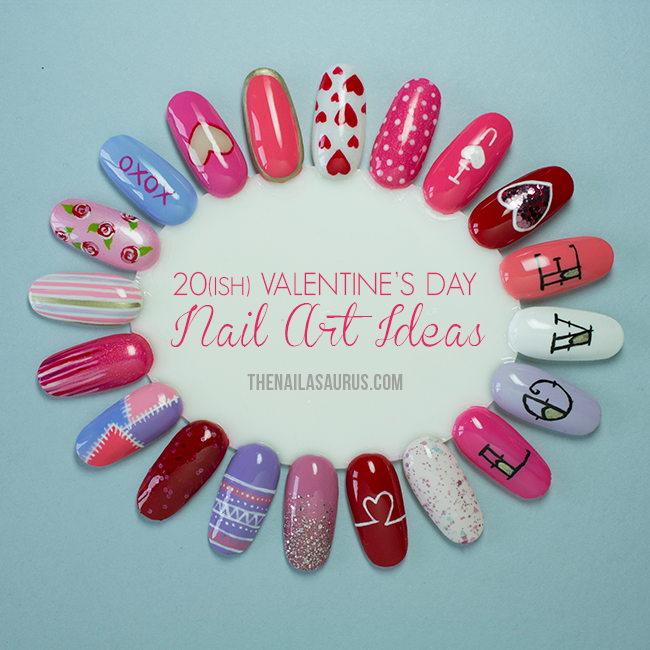
    20(ish) Valentine’s Day Nail Art Ideas

    Valentine's Day Nail Art Wheel
    For the last 7 days or so, my desk has been completely overflowing with an array of pink polishes and today is the day I finally finished my Valentine’s Nail Wheel. I forgot how long these things take but I had a so much fun with my Christmas Nail Wheel that I thought I’d do the same for Valentine’s Day! Many of these designs have been seen before on this blog and I’ve linked to tutorials wherever I have written/can find them. There will be plenty of Valentine’s nail art coming up this week in the run up to the 14th but I wanted to share this as I know plenty of you will be on the prowl for romantic nail art ideas and this selection might spark something in you!

    Soft Coloured Tribal. Glitter Gradient. Heartbeat. Delush Polish Je Ne Sais Quoi.

    Freehand Nail Tatz with Tattoo Ink font
    Alternatively: Nailz Craze NC06 Stamping Plate
    Glequin Heart. I ♥ U. Polka Dots. Love Hearts.
    Share:
    Freehand, Halloween, Uncategorised

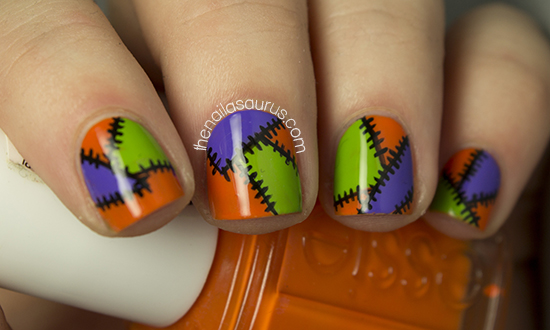
    Halloween Patchwork Nail Art

    With Halloween coming up I’ve been racking my brain for nail art ideas so I plucked the spookiest colours I own out of my stash and decided on a patchwork design. This is one of those designs that’s quite versatile and is completely changed by the colour selection. Imagine it in pastel colours with white stitching and tell me it wouldn’t be perfect wear for a baby shower!

    I used Essie Fear and Desire as my base colour and then freehanded on the colour blocks using a nail art brush with Sally Hansen Grass Slipper and Models Own Pukka Purple. If you’re not very confident with a brush, you could also use scotch tape to section off the squares and paint in the colour before peeling the tape away.

    For the stitching detail, I used Black Acrylic Paint and a nail art brush. I started by outlining the blocks of colour and then adding the little stitches.

    It’s all topped off with a coat of Color Club Top Coat.

    P.S. I did a tutorial for bloody drips, another look perfect for Halloween, over at Divine Caroline this week. See the full post here.

    TwitterBloglovin’Tumblr

    Share:
    Uncategorised

    Happy Fourth of July

    Being in the UK I don’t get to celebrate Independence Day but I’d still like to wish all my US friends a happy Fourth of July! The holiday looks like a helluva lot of fun to me (I may or may not be a closet pyro!). Here we have to wait until November 5th for bonfires and fireworks! However, geographical misfortunes won’t stop me when I spy the opportunity for some themed nail art! 

    I actually created this mani (plus a tutorial) for Divine Caroline where I’ll be doing a bit of writing here and there from now on. So if you want to see the tutorial for this look, jump on over to my post on DivineCaroline.com… Stars and Stripes Nail Art

    TwitterBloglovin’Tumblr

    Share:
    Freehand, Uncategorised

    Happy Easter!

    Happy Easter weekend everyone, I hope you’re all having yourself a great one. I think four days off work was just what the blog doctor ordered for me. I’ve given my room a good spring clean, finally got around to designing and ordering the business cards that have been on my to-do list for two months and, best of all, I’ve had some time to sit down and do some real nail art!
    As much as I love pretty patterns and gradients and glitter, that stuff can get boring and my real love when it comes to nail art is themed freehand stuff like this and I think you’d all probably agree with me on this one!

    My base colours (from thumb to pinky) are 
    Barry M Textured in Atlantic Road
    Barry Textured in Station Road
    Sally Hansen Crinoline
    Barry M Textured in Ridley Road
    NYC Expert Last in Lavender Cupcake
    Other colours I used include Born Pretty Sky Blue and Matt White, Barry M Dragon, Rimmel Grey Matter, NYC Water Street Blue and NYC Wild With Passion.
    Finally I added a top coat of Seche Vite, which is available from Beauty Encounter, followed by a coat of Rimmel Matte Finish. This  has had an interesting effect on the textured polishes, they still look kind of textured but the effect isn’t as pronounced.

    TwitterBloglovin’Tumblr

    Share: