Follow:
Browsing Category:

Stamping

    Glitter, Stamping, Studs, Uncategorised

    Pop

    The pink polishes in my collection get overlooked most of the time – I’m just not a pink and sparkly kind of girl. I spotted this colour combination somewhere this week (although I have no idea where!) and it just popped right out at me so the next logical step was to paint it on my nails! 

    The blue is Barry M Guava and the pink is an unnamed Kriston polish which is a brand I’ve only ever seen in my local pharmacy.  On my pointer finger, I used one coat of the Kriston polish with two coats of Sally Hansen Lady Luck. The black studs are from Born Pretty Store and on my ring finger I’m wearing a base coat of Barry M White stamped with W7 Black and Bundle Monster Plate BM201.

    TwitterBloglovin’Tumblr

    Share:
    Gradient, Stamping, Uncategorised

    Barry M Summer 2013 Gellys

    Press Sample

    Next month Barry M are adding 5 new shades to their amazing Gelly range ready for summer. I feel kinda bad teasing you with them this early but I really couldn’t wait to show you… forgive me?! 
    As always I’ve got only good things to say about these shades, the formula is perfect and the colours are absolutely stunning. Without a doubt, these are my favourite shades to come out of the Gelly range yet. I’ve split the polishes in to two batches – the warms and the cools – to do some nail art!

    Passion Fruit is a coral which leans more towards orange and it’s the best coral I’ve ever worn. Too often I find coral shades are very jelly like and almost impossible to get opaque but this one only needs two thin coats.
    Mango is a creamy orange colour, again perfect in two coats. Beware though, this one’s a stainer so make sure you wear a good base coat underneath.
    On my index finger, I used Mango as a base and stamped using Passion Fruit and Konad plate M60. There’s a gradient tutorial here and a striping tape tutorial here for the other nail art. It’s all topped with a coat of Sally Hansen Dries Instantly.

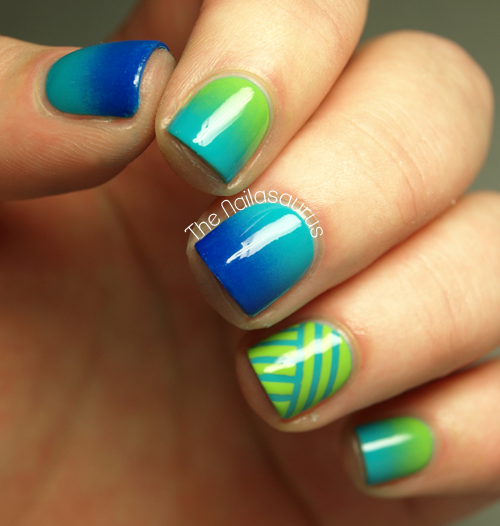
    My favourite of the 5 new shades is Guava – the aqua blue. I’m a sucker for blue nail polish, especially when it applies this easily, looks this good and doesn’t stain my nails. 
    The green, Key Lime, is also another stand out for me. It’s so close to being slime green but it’s just on the right side of bright and beautiful – one of the first bright greens that works with my skin tone. And how amazing does it look next to Guava? It did leave a bit of staining so use a base coat!
    Finally we have Blue Grape, the cobalt blue. This is a great dupe for Revlon Royal and the most ‘jelly finish’ like polish of the bunch but it’s completely opaque in two coats, unlike Royal which needs a lot of coats and tends to drag at the cuticles.

    Again, we have a gradient tutorial here and a striping tape tutorial here and it’s topped off with a coat of Sally Hansen Dries Instantly.

    These new shades will be available in Superdrug on June 5th and Boots on June 12th.

    TwitterBloglovin’Tumblr

    Share:
    Glitter, Stamping, Uncategorised

    Just Give Me the Quick Gray by Gray

    After a tip off on Twitter last weekend, I found myself browsing Fragrance Direct and I found out where they’ve been hiding all those discontinued Sally Hansen shades! That website has stackloads of them for £1.49 including my favourite off-white – Ion, and flittery gold – Gilded Lily. After Googling for swatches of all the shades I didn’t already have, I settled on 3 colours including this beauty – Gray by Gray. It’s a very rich, blue tinted, dark grey.

    I started with a base colour of Sally Hansen Gray by Gray then stamped on the Paisley design from Bundle Monster Plate BM-315 using Essie Blue Rhapsody, a metallic blue.
    The glitter on my ring finger is Chit Chat Ariel which I picked up in Poundland. I finished it all off with a coat of Sally Hansen Dries Instantly plus an extra two coat over the glitter.


    TwitterBloglovin’Tumblr

    Share:
    Glitter, Stamping, Uncategorised

    The Nailasaurus is 3!

    3 years ago, on this very day, I sat down at my computer, signed up to Blogger and created this blog. I didn’t have big dreams for it at all, at the time it was just my little contribution to the very small online community of people who were passionate about polish and quite honestly a great way to procrastinate on my school work! 
    Today it’s a huge part of my life and I could never have imagined it would become what it is today. I feel like I owe a lot to this blog and I know my life would be very different today if I hadn’t spent the last three years diving head first into my nail art obsession! Of course, I owe all of this to you guys. Thank you so much for reading, commenting, sharing and just generally being an awesome bunch of readers!
    I thought I’d take a look back through the archives and dig out an early mani to recreate it and I’ve gone with the ‘Mint Mesh‘ from July 2010, about 3 months in to my blog. Back in the day I used to post exclusively stamping manicures on a daily basis. I didn’t start experimenting with other nail art techniques for months and it was almost a year before I tried my first freehand nail art. It’s good to see the immense improvement in the photography and my neater nails and cuticles.

    This time around I used Sally Hansen Green Tea as my base colour, then stamped on the fishnet design from Konad Plate M57 using Barry M Gold Foil.
    On my accent finger I used one coat of PVA Glue before applying three thin coats of Sally Hansen Gilded Lily. I used one top coat of No7 Stay Perfect.

    TwitterBloglovin’Tumblr

    Share:
    Gradient, Stamping, Uncategorised

    Gruedient with Stamping

    I’ve had a busy week with very little time to paint my nails but I did get a chance to jazz up the nail art from my last post. It’s been a long long time since I wore any leopard print on my nails and for me, Konad plate M57 is the only way to go! I’ve tried freehanding the pattern but stamping it on is so much quicker and I know it’ll be perfect every time so I always end up getting my stamper out!

    The colours used in the gradient are Sally Hansen Green Tea and Barry M Light Blue (gradient tutorial here). I added the leopard print using Born Pretty White with Konad Plate M57 and finally, I added a few dots of Sinful Colors Call You Later with a nail art brush.
    It’s all topped off with a coat of Sally Hansen Insta-Dri.

    TwitterBloglovin’Tumblr

    Share: