Follow:
Browsing Tag:

Revlon

    Glitter, Gradient, Uncategorised

    Kitty Cat

    This last week or so I’ve been completely obsessing over these cutie-pie cat nail decals from Born Pretty Store. I bought a bunch of designs with my fingers crossed that they would be the super bendable and sticky decals that I like and that actually work on my nails so I’m very happy that they are! When they first showed up I was a bit disappointed that they were covered with a holographic sheen as this wasn’t very clear in the photos. Once I saw past the sheen and realised how easy they are to apply, I grew to love them and I’m about to go back and order pretty much every design on the website. Oh, and they glow in the dark!
    I’m going through a bit of a dry spell with nail art at the moment which is a shame because I had a good blogging streak going. I need to snap out of the drought soon because I have The Lacquer Legion and Nailvengers both coming up this Friday. Better go now, I have some panicking to do!

    For the gradient nails I used Revlon Cloudy as my base colour and created the gradient using Rimmel Aqua Cool. There’s a gradient tutorial here.
    I topped the gradients with a coat of China Glaze Fairy Dust and finished with a coat of Glisten and Glow HK Girl.
    For the kitty cat nail, I used a base coat of Barry M White first as the decals are not completely opaque. I had to trim down the decal so that the whole cat face would fit on my tiny nails and then just placed it on and smoothed it down with a finger, tucking the edges under my cuticles with a toothpick. You can buy the decals from bornprettystore.com.

    Share:
    Gradient, Stamping, Uncategorised

    Purple Gradient Nail Art With Stamping

    My nails and cuticles are a bit worse for wear recently so I’ve been drowning them in cuticle oil and Nail Butter whenever I get the chance. They’re drink it up like there’s no tomorrow and I’m hoping they’ll be suitably quenched very soon. Today’s nail art is nothing you haven’t seen before but it’s a simple classic that will quite possibly always be my bread and butter!

    Purple Gradient Nail Art with MoYou Stamping

    Purple Gradient Nail Art with MoYou Stamping
    I created the gradient using Revlon Cloudy and a very old Sally Hansen Lavender Colour. There’s a gradient tutorial here.
    I topped a few fingers with China Glaze Fairy Dust.
    The stamping is from MoYou Plate Tourist 07 and a couple of designs from the Fairytale collection but those plates don’t seem to be in stock at the moment. I used BK Matte White.
    It’s all topped off with a coat of KBShimmer Clearly On Top.

    Purple Gradient Nail Art with MoYou Stamping

    Purple Gradient Nail Art with MoYou Stamping

    Purple Gradient Nail Art with MoYou Stamping

    Purple Gradient Nail Art with MoYou Stamping
    Share:
    Glitter, Gradient, Stamping, Uncategorised

    NDLacquers Aurora Swatch with Nail Art

    Today I found out that I topped The Crumpet’s Reader poll for ‘Nail Art Blog of the Year‘ and I want to thank everyone that put in a good word for me – you know who you are, you sly dogs! And of course, a big thanks to Debbie for holding the poll in the first place! To be voted top of the poll by readers is such an honour because you guys really know your stuff when it comes to nail blogs and if it weren’t for such a tight, amazingly friendly and accepting community, none of us bloggers would be here! So, thank you for a brilliant end to the year.Today’s nail art features a gradient (it’s there I promise!) and a pretty glitter from NDLacquers called Aurora. It’s one of three in Natali’s Holiday Collection but it’s an all-year-rounder in my book. I’m only wearing one coat in this swatch and the coverage is fantastic. This is one indie brand you’re going to want to keep your eye on in 2014 – I can feel it in my bones!

    I used two coats of Revlon Cloud as my base colour and created a super subtle gradient using Maybelline Ceramic Blue. Gradient tutorial here.

    The stamping is from MoYou Plate Pro 04. This plate is no longer on the site but the same design is available in XL size on the Pro 07 Plate. I stamped using BK Matt White.

    The glitter is NDLacquers Aurora and I topped it all off with two coats of Rica Glossy Glam.


    Share:
    Glitter, Gradient, Stamping, Uncategorised

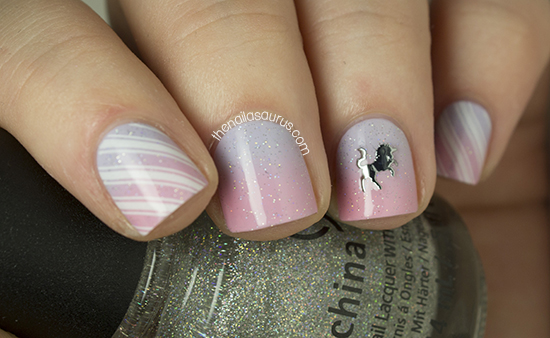
    Pink and Purple Gradient with a Sprinkling of Fairy Dust

    Last week I was crazy excited about my incoming bottle of China Glaze Fairy Dust and now that I have it, I know it was completely justified! It’s everything I dreamed of! I’ve worn it a few times over a plain colour mani but I really think it looks best over nail art. I was so excited to try it over a gradient and I really don’t think I could have picked a better colour combo. The two shades I used are really awful polishes on their own – bad brushes and a watery formula – but those are always the ones that are perfect for gradients.

    Pink and Purple Gradient Nail Art with a Sprinkling of Fairy Dust

    Pink and Purple Gradient Nail Art with a Sprinkling of Fairy Dust
    I used Revlon Cloud as my base colour and created the gradient using W7 Baby Pink. Tutorial for that here!
    I topped the gradient with one coat of China Glaze Fairy Dust and added some stamping from Bundle Monster Plate BM423 using BK Matt White.
    The little unicorn is from She Sells Seashells but seems to be out of stock at the moment.
    Finally it’s all topped off with a two coats of Glisten and Glow HK Girl with a few extra coats on the unicorn to seal it in.

    Pink and Purple Gradient Nail Art with a Sprinkling of Fairy Dust

    Pink and Purple Gradient Nail Art with a Sprinkling of Fairy Dust

    Pink and Purple Gradient Nail Art with a Sprinkling of Fairy Dust

    Share:
    Review

    Revlon by Marchesa: Royal Burgundy Review


    I knew as soon as I saw these Revlon by Marchesa nail appliqués that they were something a bit special. So special in fact, that I’ve been holding on to them for a suitable occasion and now that party season is upon us I thought it would be the perfect to show them off.

    It seems that 2013 was the year of the nail wrap and I think the standard of these products has really stepped up across the board. Because my nails are very curved, any wraps that I wear have to be the thin stretchy kind or just insanely adhesive to have any chance at staying attached. These fit in to the second category!

    Revlon by Marchesa: Royal Burgundy

    These nail wraps are very sticky and thin enough to get a good purchase on your nails without too many crinkles. As with all wraps – the flatter your nail beds, the less chance of crinkling. As you can see in my pictures, there are few bumpy bits near the edges but they aren’t noticeable from a distance.
    These are applied by sticking them in place on your nail and then filing off any excess that extends past your nail tip. The mini nail files that came with the wraps for getting rid of the excess were very rough so I opted for my glass nail file instead which did the job with no unnecessary damage to my nails.

    The range contains 8 different and exquisitely crafted designs each inspired by a dress from Marchesa’s archives. The design I’m sporting is Royal Burgundy. Each pack contains 18 appliqués in a good range of sizes so you’re guaranteed to find a match for your nails and it comes in handy if you mess up a few! I have some left from this set which I’ll be saving to wear as accent nails on occasion.

    The sets run at £8.99 each which is a few pounds more than most nail wraps you’ll find on the high street but justified by the exceptional 3D designs. This is the kind of item that I would reserve for a special occasion where I’m going to get dressed up! I think they’d also be perfect for a bride on her wedding day. Silk Rosette (blue florals on clear) could be your something blue and Crown Jewels (gold details on clear) over a pale pink or shimmery white polish would look breathtaking.

    Revlon by Marchesa: Royal Burgundy

    I couldn’t resist added a gold spark to my usual make-up to match my nails!

    Revlon by Marcesha Appliqués are £8.99 from Boots.com and in selected Boots and Superdrug stores nationwide.
    Share:
    Stamping, Uncategorised

    Dreamy

    Today I’m debuting the Bundle Monster fan plates here. I bought these a while ago, along with a second plate holder to house them all. The Bundle Monsters got overlooked because I’ve been so taken with the MoYou plates recently but I saw Nail Newbie using this stamp and just had to dig it out of the drawer!

    I’m trying some new things with my photos so this a heads up that they may be a bit hit and miss for a while until I figure out how I like them! I haven’t changed too much, just the background and a few things in post-production but I think they’re already looking better. Constructive feedback is very much appreciated, I’d like to know how they look on your screens as I know they can vary!

    The bluey lavender shade is Maybelline Ceramic Blue and I used H+M Jo Is In The House over the top for the glittery accent. The pink shade is Revlon Sweet Tart and I stamped over the top with Bundle Monster plate BM410 using BK Matt White.

    I topped it all off with two coats of Cult Nails Wicked Fast.

    Share:
    Freehand, Gradient, Uncategorised

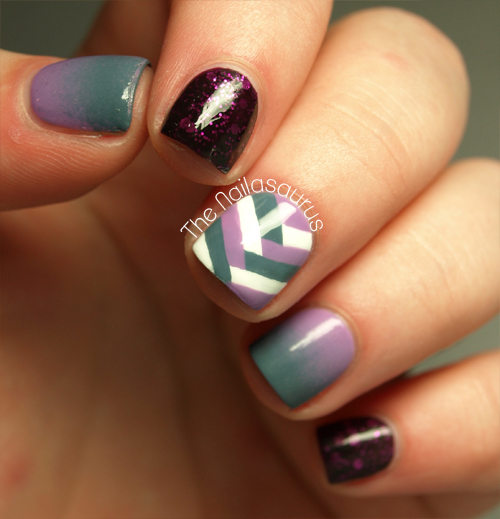
    Facets of Fishtail

    It’s only now that I’m writing this post that I remember I really wanted to mattify this manicure! I think the purple glitter would look phenomenal with a matte top coat. I’ve had matte on my mind for a long time now but it always skips my mind when I’m actually in a position to use it, doh! I think I need to put my matte top coat in prime position on my desk so I don’t forget it next time I wear a pretty glitter.

    The beaut of a glitter is Revlon Facets of Fuschia and I applied that over a coat of PVA glue to make removal nice and easy.
    I created the gradients using Sally Hansen No Hard Feelings as the base with Sally Hansen Gray by Gray. Finally, for the fishtail nail I used a nail art brush to apply those two Sally Hansen shades with Born Pretty’s Matt White polish.
    It’s all topped off with a coat of Sally Hansen Dries Instantly.

    TwitterBloglovin’Tumblr

    Share: