Follow:
Browsing Tag:

piCture pOlish

    Glitter, Tutorial, Uncategorised

    piCture pOlish Blog Fest 2013

    Press Sample


    – Celebrating the Year of the Blogger –

    I’ve been absent for a bit longer than planned since my holiday but I’m back with a bang today as it’s piCture pOlish’s Blog Fest! This will be the second year that piCture pOlish have held Blog Fest which involves dozens (maybe even hundreds) of nail bloggers worldwide. We’re all posting our nail art creations today and 3 of us will be chosen to create a collaboration shade with piCture pOlish. One will be voted for by you guys on Pinterest, one by the participants and the final one will be chosen by the girls at piCture pOlish!

    If you want to vote, you can check out all the entries on the Pinterest Board and submit your favourite on the piCture pOlish website!
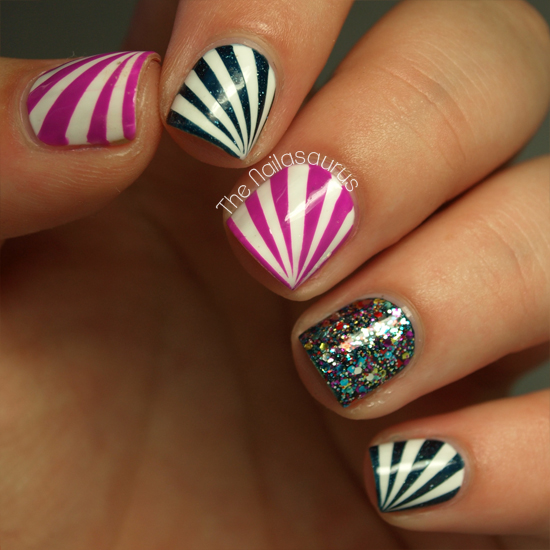
    I was sent three piCture pOlish shades to work with; Blogger, Hope and Mad Magenta. I decided to create this starburst design using scotch tape with an accent nail of two coats of Blogger over two coats of Hope. Cutting the tape is definitely the trickiest part of this nail art! At first it’s difficult to get such tiny strips but once you get the hang of it, it’s comes easy.
    Step 1: Start with a base coat of white nail polish, I used Barry M White, and apply a fast drying top coat. 

    Step 2: Cut some very thin triangles out of scotch tape. Aim for about 4-5 triangles per nail.

    Step 3: When your base colour is completely dry, use tweezers to place the triangles on to your nail working from one corner outwards. Make sure there’s a bit of overhang by the cuticles so you can easily grab it to remove.
    Step 4: Paint your second colour over the tape.
    Step 5: As soon as possible, carefully remove the strips of tape.
    Step 6: Finally, add a top coat and use a nail art brush dipped in acetone to clean up any mess around your cuticles.

    piCture pOlish ship worldwide from their website but you can also click here to find piCture pOlish stockists in your country. Make sure you check out there Everyday Deals page before you order so you’re not missing out on any offers!
    Where to find piCture pOlish
    Share:
    Uncategorised

    Stripes and a Feather from Brit Nails

    Allie from Brit Nails is bringing you today’s nail art. Allie has some of the most beautifully manicured nail beds I’ve ever seen and I just can’t get enough of her amazing photos. As an appreciator of minimalist design, I jump for joy when one of Allie’s nail art posts shows up on my dash. If you’re one for amazingly detailed swatches and understated nail art, make sure you go and follow Allie’s blog!

    Where to find Brit Nails
    Blog – FacebookTwitterInstagram
    ——————————————————————————————-

    Hi! I’m really happy to be doing a guest post on The Nailasaurus as it’s one of the blogs that has inspired me from the start, so it’s quite exciting! I knew I wanted to do something using shades of blue, so I just sat at my desk and this is what I came up with.

    I started with a base of Illamasqua Caress. I added a stripe of Illamasqua Cameo over half of my nail, and then a stripe of Barry M Turquoise down the middle. I used a small striping brush to paint the dividing lines on, using Barry M Cyan Blue and piCture pOlish Ocean
    I didn’t want to do a whole manicure of stripes, so I decided to bust open my packet of craft feathers! I started with a base of Barry M Cyan Blue. I added some top coat and then stuck the feather down and trimmed the edges to fit using a cuticle trimmer. There is a great tutorial for using feathers right here on The Nailasaurus! 
    Thank you Sammy for asking me to do a post! I hope everyone likes it! – Allie x
    Share:
    Galaxy, Uncategorised

    Fractal Fingertips from Will Paint Nails For Food

    Today’s guest post is coming to you courtesy of Meghan from Will Paint Nails for Food
    Meghan’s been at the nail blogging game for less than a year but she’s already making waves and once you see her nail art you’ll know why! If you follow the nail art tag on Tumblr, you’ve probably seen her nails on there more than a few times. She’s currently in the middle of the 31 Day Challenge so make sure you go and follow her to keep up to date with her creations!

    Where to find Will Paint Nails for Food
    BlogFacebook – Instagram – Tumblr – Bloglovin’
    ——————————————————————————————-

    Hi everyone! What an honour it is to be writing for this blog. Thank you Sammy for having me here!

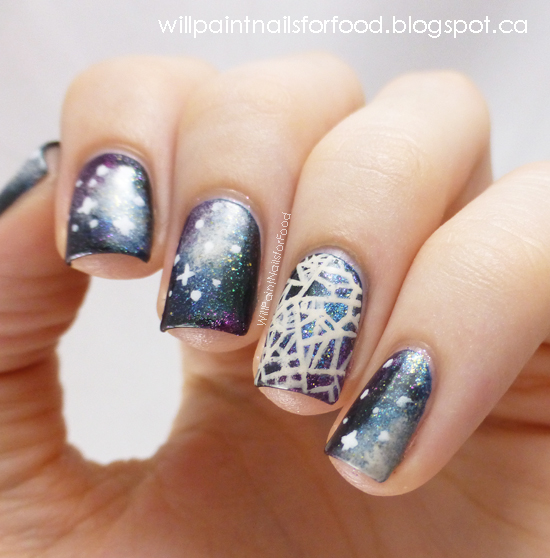
    I had the idea of combining galaxy nails with some sort of fractal design months ago. I’m no expert on the subject but simply put, fractals are complex geometric designs where the small parts are very similar to the larger overall pattern. And there are many connections between galaxies and fractals – some believe the universe is just a large fractal.

    I’m not sure how successfully the accent nail conveys the idea of fractals, however, you can check out the source image HERE .

    Here’s the steps I took for these nails:

    1. I started with a base of Essie Midnight Cami
    2. Using little bits of makeup sponge I slowly built up the colours, first with the blues using piCture pOlish Cosmos, piCture pOlish Pshiiit, Foxy Paws One More Night, and Zoya Crystal
    3. Then I built up the purples with Nicole by OPI Back In My Gloria Days, and Zoya Carly
    4. I added my blacks with Orly Liquid Vinyl and Liquid Sky Lacquer Party All Night
    5. I added the nebula effect with more Zoya Crystal and OPI My Vampire is Buff
    6. I painted the stars with a detail brush and Sally Hansen White On
    7. For the accent nail, the base is the same as the others, only I didn’t add the lighter nebula. The fractal design is painted with OPI My Vampire is Buff and a detail brush.
    8. I finished with two coats of KBShimmer Clearly On Top

    I love galaxy nails because, generally, most people use the same technique, but everyone’s looks different. I tend to use more polishes than necessary, you probably don’t need this many colours.

    I hope you enjoyed my post, and thanks again Sammy for having me here!

    TwitterBloglovin’Tumblr

    Share: