Follow:
Browsing Tag:

Nail Wheel

    Halloween, Nail Art

    18 Halloween Nail Art Ideas: 2016 Edition

    easy-halloween-nail-art-ideas

    Safe to say, it’s become quite the tradition for me to create a wheel of Halloween nail art ideas this time every year (you can see last year’s here and the year before here). This year, I still included a few of my favourites like ‘Scene of the Crime’ and ‘Broken Glass’ but there’s plenty of new material to keep you going.

    Before we start, just a quick to a shout out to the Dance 20 Detail Brush for the freehand work and Barry M Black Forest for all things black. So, let’s get on to the good stuff… Read more

    Share:
    Halloween, Nail Art

    18 Easy Halloween Nail Art Ideas

    Easy Halloween Nail Art Ideas

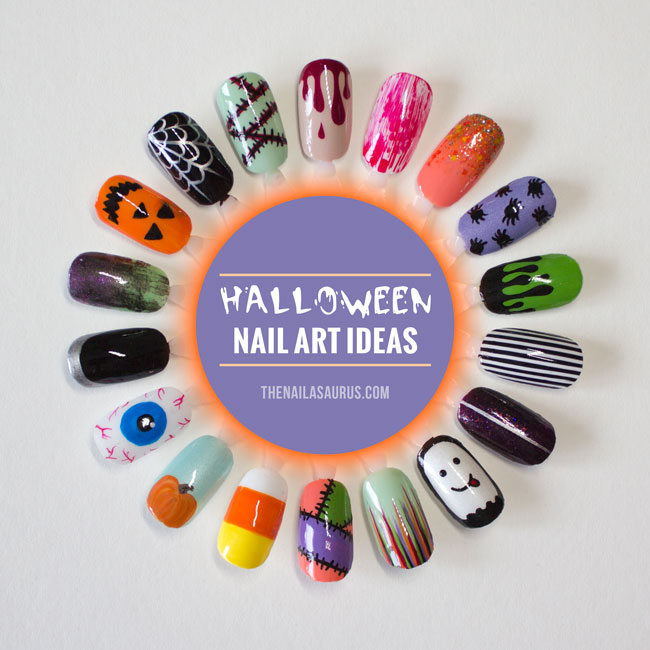
    Halloween is just around the corner and as much as I wish I could spend every hour until then painting spooky designs on to my nails, real life’s just going to poke its nose in and get right in the way! So that I can still have my fun, I’ve put down 18 of my favourite Halloween nail art designs on to a nail wheel.

    All 18 designs are quite easy as long as you know your way around a nail art brush. However, some do require more patience that others (hello rhinestones!). So, what are you waiting for, pull out all of your creepiest colours and get stuck in! Read more

    Share:
    Halloween, Nail Art, Uncategorised

    18 Easy Nail Art Ideas for Halloween

    Easy Halloween Nail Art

    October has completely flown by and I can’t believe Halloween is less than a week away! I haven’t posted a single Halloween nail design yet this year so I wanted to round up a couple of easy designs that anyone can do for the holiday.

    I started on this nail art wheel last week and just had a few details to finish off last night, when I spilled a whole lot of nail polish remover over the whole thing. Despite my best efforts, I couldn’t rescue it so I had to start over! I think the second attempt is better than the first anyway since I knew exactly what I was doing this time around. I also made my way through 5 episodes of Once Upon a Time while doing it so it wasn’t a complete disaster!

    Don’t forget to tag me @thesammersaurus and use the hashtag #looknailasaurus if you recreate any of these designs so I can see!

    Easy Halloween Nail Art

    No Nail Care

    Start with a base coat that matches your skin tone or even leave your nails bare. Use a deep red to give the effect that you’re bleeding straight out of your cuticles.
    Polishes Used: Barry M Lychee, Revlon Bordeaux

    Frankenscars

    Over a green base, paint some red lines using a nail art brush, then add the stitching using black paint or polish.
    Polishes used: Nicole by OPI I Shop Mintage, Barry M Red, Black Acrylic Paint

    Catching Flies

    Paint a few silver lines coming out from the corner of your nail. Connect them up with some ‘dips’ to create a cobweb.
    Polishes Used: W7 Black, A-England Excalibur Renaissance

    Halloween Nail Art For Beginners

    Happy Jack

    Paint your nails with a bright orange polish and add details
    Polishes Used: Essie Fear & Desire, Black Acrylic Paint

    Distressed Gradient

    There’s a tutorial for the distressed look at Chalkboard Nails.
    Polishes Used: piCture pOlish Tail Feather, piCture pOlish Hussy, A-England Dorian Gray

    Morticia

    Named so because it’s exactly what Morticia Addams would be rocking on her nails! Start with a black base coat and freehand on the ruffian edge with a silver chrome polish.
    Polishes Used: W7 Black, A-England Excalibur Renaissance

    Easy Halloween Nail Art Ideas

    Eye See You

    I believe this design is originally by Wah! Nails. Over a white base colour, start with the largest blue circle as the pupil. Draw a smaller black circle inside it as the iris and add a small whit dot just to the edge of the iris. Using a thin brush, add some wiggly veins creeping in from the edges.
    Polishes Used: Graffiti Nails Ice White, Barry M Malibu, W7 Black, Barry M Red

    Pumpkin Patch

    Over a light base colour, paint on a pumpkin shape at the very base of your nail in orange polish. Mix the orange polish with a little bit of yellow to add some highlights.
    Polishes used: Barry M Meadow, Essie Fear & Desire, NYC Lexington Yellow

    Candy Corn

    Paint your nails white and wait for it to dry. You can either freehand on the blocks of yellow and orange or use scotch tape to mark off each section as you go for a super crisp edge.
    Polishes Used: Graffiti Nails Ice White, Essie Fear & Desire, NYC Lexington Yellow

    Halloween Nail Ideas

    Patchwork

    Tutorial here
    Polishes used: China Glaze Mimosa’s Before Mani’s, Rimmel Keep Calm and Party, Sally Hansen Grass Slipper

    Halloween Waterfall

    Tutorial here
    Polishes Used: Nicole by OPI I Shop Mintage, Revlon Bordeaux, Essie Fear & Desire, W7 Black, Rimmel Keep Calm and Party

    Goofy Ghost

    Start with your white base colour and paint a black frame around your nail using a nail art brush. Near the cuticle, add a wavy line and fill in any gaps. To finish up, add some dots for eyes and and pokey tongue.

    Polishes Used: Barry M Pearl, W7 Black

    Halloween Nail Art

    Hallowen Glitter

    If you’re in a rush, a spooky glitter will do the job! Add some simple details using silver polish.
    Polishes Used: China Glaze Cowgirl Up, Orly Fowl Play, A-England Excalibur Renaissance

    Pinstripes

    Paint a white base colour and add a top coat to speed up drying time. Use striping tape to mark off your pinstripes, paint over everything in black and immediately remove the tape. Perfect pinstripes every time!
    Polishes Used: Graffiti Nails Ice White, W7 Black,

    Toxic Waste

    Start with your slimy green base coat and paint on the drips using a small nail art brush.
    Polishes Used: Sally Hansen Grass Slipper, Black Acrylic Paint

    Halloween Nail Art

    Crawlers

    Use a large dotting tool to create the ‘bodies’ and add the 8 legs to each using a little nail art brush.
    Polishes Used: piCture pOlish Eerie, W7 Black.

    GlitterBomb

    Just go nuts with glitter! Use a make-up sponge to create the gradient effect.
    Polishes Used: Barry M Papaya, Sally Hansen Sparktacular, Lac Attack Weasley’s Wizard Wheezes

    Dexter’s Lab

    This was a bit of a fluke! I used the distressed technique with red over white and got this amazing streaky look. I don’t know if it was the brush or polish but my gosh, it works!
    Polishes Used: Graffiti Nails Ice White, Barry M Red

    Share:
    DIY, Tutorial

    DIY: From Nail Art to Wall Art

    Nail Art is a labour of love and to see all of that hard work washed away with the swipe of a cotton pad can be sad. Especially when it’s one of those amazing manis that everyone complimented you on and nearly caused a car accident because it was so pretty you couldn’t stop staring at your hands! Read more

    Share:
    Nail Art, Uncategorised

    18 Summer Nail Art Ideas to Try This Weekend

    I always have so much fun painting nail wheels and wanted to do one with some ideas for summer nail art. There are 18 designs here and I tried to make a nice mix of easy to medium difficulty designs. Read on for a breakdown of each look and if I can remember what polishes I used, I’ll list them too!

    Summer Nail Art Inspiration

    1. Triple Edge

    When your base colour is dry, paint a thin line at each edge of your nail then join the ends together with a line that goes across.
    Rimmel Breakfast in Bed | Barry M Cancun

    2. Strawberry Pinstripe

    Paint a pinstripe base using a striping polish over your base colour. To freehand the strawberries, paint some red pear shapes, then add the leaf detail at the bulky end! If you’re feeling adventurous, add some tiny dots to add texture.
    piCture pOlish Totes | Sweet Color Liner Polish

    3. Bunting

    Using white, start with 4 curved lines across your nail and then add some small triangles. Fill the triangles in with as many colours as you like!
    Barry M RhossiliSweet Color Liner Polish
    Nail Art Ideas for Summer

    4. Half/Pearls/Half

    Paint your base colour and let it dry, then paint half of your nail with the second colour. I used tape to mark off a nice straight line down the centre but if you have a steady hand you might not need to. To fix on the pearls, I used a dab of clear polish to attach them one at a time.
    Barry M Elderberry | NYC Hudson Breeze | 1.5mm Pearls

    5. Stripes

    Paint your base colour and make sure it’s completely dry. Apply some tape or straight stencils where you want to keep your base colour showing through and paint some different colours in the gaps. When it’s dry, apply striping tape where the colours meet and use a few layers of top coat to keep it stuck.
    Sally Hansen Lady Lavender | Straight Vinyl Stencils | Different Dimension Duelling Unicorns | Striping Tape

    6. Matte Gradient

    While not typical summery colours, I think the neutral and white work really well together to create a great summer look suitable for formal occasions. I created the gradient (tutorial here) and used a matte top coat to get this finish.
    Barry M Pearl | Barry M Truffle | Rimmel Matte Top Coat (alternative here)
    Nail Art Inspo for Summer

    7. Summer Waterfall

    Nicole by OPI At Least I Pink So and Yoga-Then-Yogurt | Sally Hansen Water Cooler | CK One Beach Party

    8. Polka Dots

    Using a set of dotting tools, I started this pattern with the largest dots in a diagonal line across the nail. I worked outwards from there decreasing the size of each row of dots.

    9. Saran Wrap Mani

    To get this effect, I blobbed out 4 different shades of green on to a sheet of plastic. I took a a small piece of bundled up saran wrap/cling film and dabbed it downwards on to the polish to muddle the colours together. Next, I quickly dabbed it on to the nail to create this textured effect. There’s a tutorial coming soon, I promise!
    18 Summer Nail Art Ideas

    10. The Deep V

    Paint your base colour and use a striping brush to outline a long, thin V that meets right at the tip. Fill it in and then outline if you want to!
    Barry M Huckleberry | Sally Hansen So-nata Problem | Striping Brush

    11. Pastel Galaxy Nails

    Nicole by OPI I Shop Mintage | NYC Lexington Yellow | China Glaze Fairy Dust

    12. Summer Holiday

    These are all DIY Nails water decals from the Aloha set
    Barry M Coconut | DIY Nails Aloha 
    Summer Nail Art

    13. Make Like a Tree…

    …and leave!
    Let your base coat dry and paint a line diagonally across your nail then start painting lines from one edge to meet the line in the middle. Next, paint lines going downwards, matching them up where the horizontal lines touch the middle.

    14. Daisy, Daisy

    Paint about 5 white lines bursting out from the centre of your cuticle and build a petal shape around each line. Once that’s dry, add a yellow centre and finish with top coat.
    NYC Hudson Breeze | Pure Color Liner Polish | NYC Lexington Yellow

    15. Sunset Gradient

    Nicole by OPI At Least I Pink So | piCture pOlish Totes | China Glaze Fairy Dust
    Summer Nail Art Ideas

    16. Pastel Glitter

    Barry M Rose Hip | Claire’s Shiver

    17. Walk The Line

    Using a striping brush, paint the thinnest line possible straight down the middle of your nail. SImple but effective!
    Rimmel You Had Me at Hello | Barry M Gold Foil | Striping Brush

    18. Dragonfruit

    W7 Salt and Pepper | piCture pOlish Electric Dream
    If you post your recreations on Instagram, please tag #looknailasaurus as I love to see them and sometimes miss them if you only tag my name.
    Share:
    Freehand, Glitter, Uncategorised

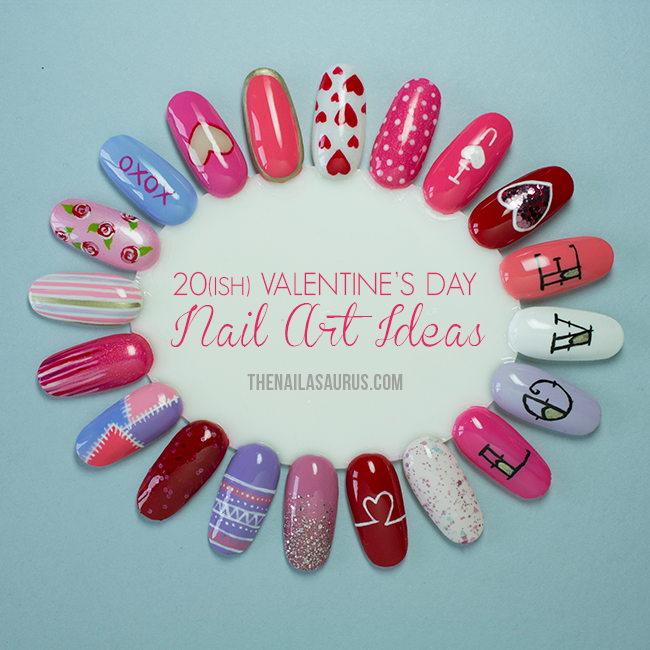
    20(ish) Valentine’s Day Nail Art Ideas

    Valentine's Day Nail Art Wheel
    For the last 7 days or so, my desk has been completely overflowing with an array of pink polishes and today is the day I finally finished my Valentine’s Nail Wheel. I forgot how long these things take but I had a so much fun with my Christmas Nail Wheel that I thought I’d do the same for Valentine’s Day! Many of these designs have been seen before on this blog and I’ve linked to tutorials wherever I have written/can find them. There will be plenty of Valentine’s nail art coming up this week in the run up to the 14th but I wanted to share this as I know plenty of you will be on the prowl for romantic nail art ideas and this selection might spark something in you!

    Soft Coloured Tribal. Glitter Gradient. Heartbeat. Delush Polish Je Ne Sais Quoi.

    Freehand Nail Tatz with Tattoo Ink font
    Alternatively: Nailz Craze NC06 Stamping Plate
    Glequin Heart. I ♥ U. Polka Dots. Love Hearts.
    Share:
    Christmas, Freehand, Glitter, Uncategorised

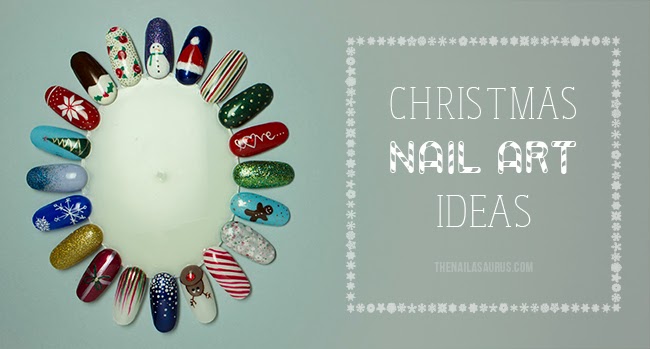
    20 Christmas Nail Art Ideas

    This year I’ve hardly posted any Christmas nail art and I feel awful for it! In previous years I’ve been all over that stuff but this month I just haven’t been able to put all my nail art ideas down on my actual nails. I know that many of us will be planning out our manicure for the big day this weekend (myself included!) so I’ve created a nail wheel full of Christmas nail art designs so that I can get all these ideas out before Christmas has been and gone!
    There’s a good range of designs here from easy glitter gradients to slightly more tricky freehanded stuff. I’ve tried to make sure there’s something for everybody, no matter your personal taste or skill level and I’ll be linking up to tutorials where I can find them. Merry Christmas and Happy Painting!!

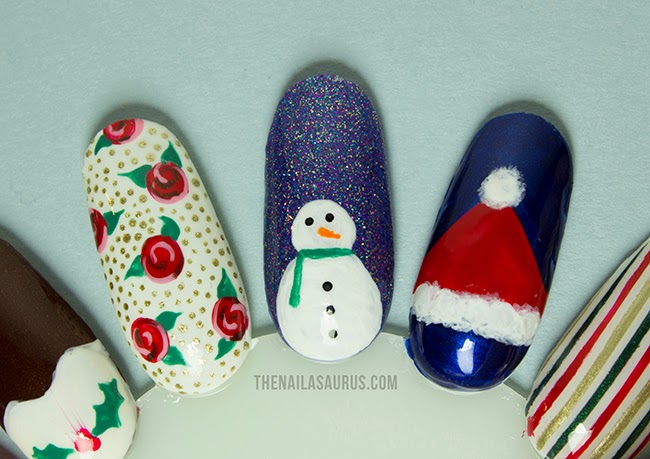
    Festive Roses
    The Nailasaurus: Freehanded Rose Tutorial

    Snowman
    I used two coats of China Glaze Fancy Pants with a coat of W7 Moonlight for the glittery base. The snowman is freehanded using white acrylic paint and various nail polishes for the details.

    Santa’s Hat
    I started with a white base coat and freehanded a red triangle in Rimmel Heart on Fire. Next I painted on the blue background colour and went back in with some white acrylic paint to make the fluffy details.

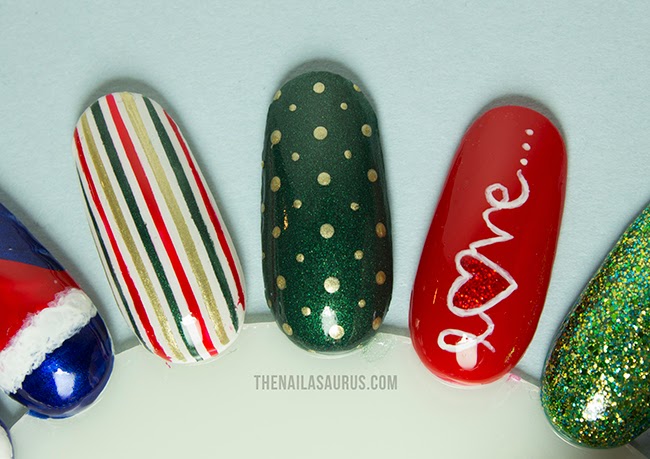
    Christmas Pinstripe
    The Nailasaurus: Striping Tape Tutorial
    Barry M Gold Foil, Rimmel Heart on Fire and Revlon Emerald City over a base of Barry M White

    Polka Dots
    Barry M Gold Foil dots over Revlon Emerald City

    L♥VE
    White acrylic paint over Rimmel Heart on Fire freehanded with a nail art brush

    Grold Glitter
    I combined W7 Cosmic Green and Sinful Colors Call You Later which are both green/gold glitter mixes to get this dimensional glitter look.
    Can’t Catch Me
    The base colour here is piCture pOlish Whimsy and I freehanded the gingerbread man with Avon Deluxe Chocolate. The white details are acrylic paint.

    Sonnetarium Peppermint Kiss
    Available at sonnetarium.net

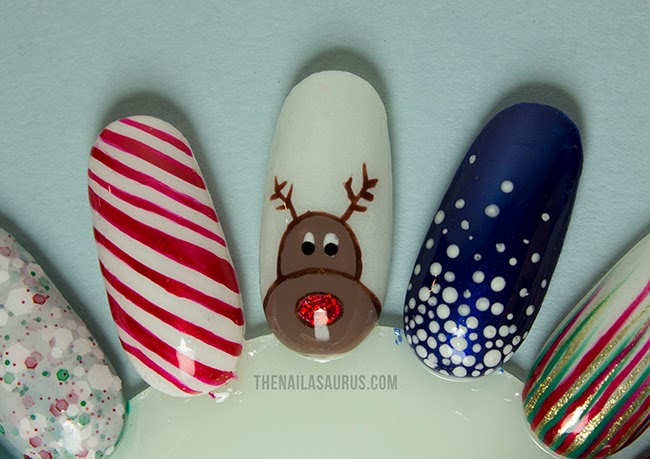
    Candy Canes
    This was freehanded using a striping brush and Essie Jag-U-Are over a base of China Glaze Dandy Lyin’ Around
    Rudolph
    Start by painting on a half moon at the base of the nail, then adding a hump on top. Outline and add antlers using a darker shade then fill in his nose with red glitter! I used Essie Glamour Purse
    Snowfall
    I used a really old blue NYC polish for my base colour and dotted on white acrylic paint using a dotting tool in a gradient pattern. Do this by first doing a layer of dots that are evenly spaced and then adding a second dose of dots just near the cuticle.
    Christmas Waterfall

    The Nailasaurus: Waterfall Nail Art Tutorial
    Essie Jag-U-Are, Ulta3 Mermaid Green and NYC Full Metal Jacket over China Glaze Dandy Lyin’ Around

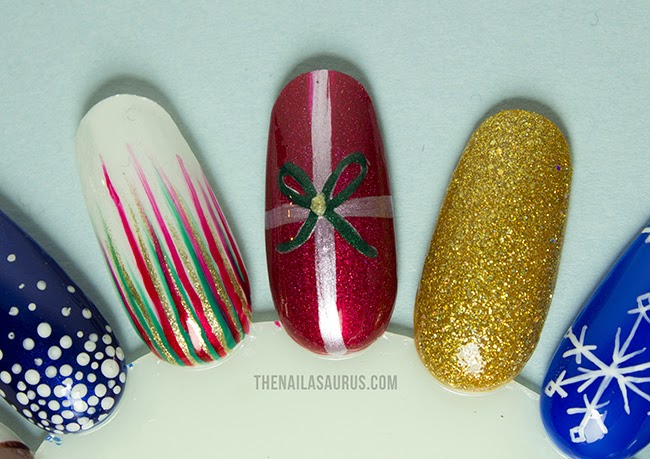
    Presents!
    The base colour here is A-England Rose Bower. I painted on the ribbons with a striping brush and freehanded the bow in Revlon Emerald City.

    Gold Glitter
    You just can’t go wrong with gold glitter at Christmas. This beauty is on coat of Cirque Helios over Nails Inc. Hampstead Gardens.

    Snowflakes
    The Nailasaurus via Divine Caroline: Snowflake Nail Art Tutorial
    These snowflakes were freehanded with white acrylic paint over Essie Bouncer It’s Me


    Glitter Gradient
    I used Barry M Blue Glitter over Maybelline Ceramic Blue. Using a sponge, lightly dab on the glitter from the tip of your nail down towards the cuticle. Repeat, but the second time around, only go half as far down as you did the first time to make sure the glitter is more dense at the very tip of your nail.

    Oh Christmas Tree
    This base colour is piCture pOlish Whimsy and I created the tree by painting on a long triangle, adding the star on top and finally decorating it with tinsel.

    Fair Isle Snowflake
    Coewless Polish: Fair Isle Snowflake Picture Tutorial

    Christmas Puddings
    The Nailasaurus via iVillage: Christmas Pudding Tutorial

    Freehand Roses (again!)
    The Nailasaurus: Freehanded Rose Tutorial

    And that’s all folks! Let me know which is your favourite design. At the moment I’m falling hard for the cute little gingerbread man and the L♥VE nail. I think I’ll have to work in the Cirque Helios as an accent nail and try some of the freehanded designs in gel polish! Oh heck, we all know I’ll end up doing a skittle manicure because I just won’t be able to choose!
    Share: