Follow:
Browsing Tag:

Neon

    Glitter, Nail Art, Uncategorised

    Nailvengers Assemble: Glitter Placement

    For July’s Nailvengers challenge, we’ve decided to jump in to glitter placement. We’re all of differing abilities when it comes to this style so you’ll see a really wide range of designs when you visit Brit Nails, Lucy’s Stash, and xAmeliax to see what they came up with for the challenge today. I’ve had these round glitter pieces sitting in my ‘to try’ pile for a while now so I thought today would be the perfect day to debut them.
    I started out just placing the dots on randomly with all the colours mixed together but after one nail, I decided I’d rather group them together in combinations of three to four colours so each nail looked different from the next. My favourite is the index finger – a surprisingly compatible combination of blue, purple and coral!

    What You’re Looking At

    Barry M Coconut
    Glisten & Glow HK Girl Top Coat
    Rose Gold Zodiac Midi Ring from Astrid & Miyu

    Share:
    Uncategorised

    OPI Neons with Nailed Kit Totally Tribal Decals

    OPI Neons with Tribal Nail Art | The Nailasaurus | UK Nail Art Blog

    After what has felt like a nail art dry spell, I finally have a steady trickle of ideas coming in. I think it’s thanks to all the new summer releases that we’re seeing at the moment. I’ll start today with a few from OPI’s Neon collection and a preview of some upcoming Nailed Kit decals.

    I was lucky enough to find the Neon shades in my goody bag from Coty’s summer nail preview on Thursday. I made my way to London to meet up with Alice and Allie and we headed to the event together. I’m a bit of a country bumpkin so I normally avoid London at all costs but since it was solely a nails event and some of my favourite brands (can you say Sally Hansen and NYC) to boot, I thought it would be worth the adventure and it totally was! I had a great day talking to the ladies at Coty and met the bloggers behind Dahlia Nails too, so there was more than enough nail talk to go round.

    The Neon shades I used here are Life Gave me Lemons (Yellow, 2 coats), Juice Bar Hopping (Orange, 2 coats) and Hotter Than You Pink (Pink, 2 coats) with one coat of the Put a Coat On! white base coat underneath. I had a little bit of streaking with the neons on the first coat but that smoothed out with the second as long as I left plenty of drying time between layers.

    This is my first time trying Nailed Kit’s decals so I wasn’t sure how it was going to go, but it turned out to be a successful attempt. The instructions said to use them like temporary tattoos – place them where you want them on the nail and apply a wet piece of cotton/tissue to the back – but this way didn’t work for me. The decal came away from the backing perfectly but I just couldn’t get the decal right where I wanted it. I tried the traditional way of dipping them in to water and dislodging the decal from the paper, then placing them on to the nail which also worked and I much preferred doing it that way.

    This set is Totally Tribal and will be available on their website in June.

    OPI Neons with Tribal Nail Art | The Nailasaurus | UK Nail Art Blog

    OPI Neons with Tribal Nail Art | The Nailasaurus | UK Nail Art Blog
    OPI Neons with Tribal Nail Art | The Nailasaurus | UK Nail Art Blog

    OPI Neons with Tribal Nail Art | The Nailasaurus | UK Nail Art Blog

    OPI Neons with Tribal Nail Art | The Nailasaurus | UK Nail Art Blog

    Where to buy OPI Neon

    RRP £11.95. Available in department stores and salons.
    Currently £6.93 each at Beauty Bay with free delivery
    Share:
    Freehand, Uncategorised, Waterfall

    Neon Waterfall Nail Art

    Are you bored of these yet? Good, because neither am I! I asked you guys for colour combination requests on my first Waterfall Mani post and by far the most popular suggestions were neons on a pale base and a monochrome scheme (stay tuned for that one). The neons were a brilliant idea – thanks to everyone that came up with that one… it reminds me of streamers, parties and carnivals!

    I used a base of Barry M Lychee and painted on the waterfall using a long, thin nail art brush and the Models Own Ice Neon collection. It’s all topped off with a coat of No7 Stay Perfect Top Coat.

    TwitterBloglovin’Tumblr

    Share:
    Uncategorised

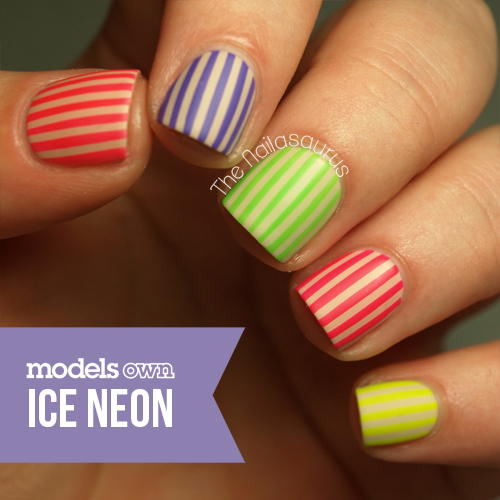
    Models Own Ice Neons

    I predicted a little while back that Neon would be a big trend this summer and it seems I was right. I’m loving all the neon nails that I see on my Tumblr and Pinterest browsing adventures. When Models Own release a nail collection of anything, you can bank on it becoming a thing!
    Models Own kindly sent me the collection to give it a test run and I’m very pleased with the polishes. Most of them have a very jelly like finish so they’re best applied over a white or light coloured polish if you prefer full opacity. The purple is the only one I’d wear without a lighter creme underneath. Applying them over white ensures they’re as bright as they can possibly be too!

    For this nail art, I applied a base of Barry M Lychee followed by a coat of Essence Better Than Gel Nails Fast Dry Top Sealer. I then applied striping tape in uniform lines to each nail before painting over it with the Models Own Neon Ice shades (click here for a tutorial). The shades, from thumb to pinky, are Pink Puch, Pukka Purple, Toxic Apple, Bubblegum and Luts Lemon. Finally I added a coat of Sally Hansen Dries Instantly followed by a coat of Rimmel’s Mattifying Top Coat.

    TwitterBloglovin’Tumblr

    Share: